
August Project Spectrum Project

After the long-long lasting snowflake project, I wanted to do something quick in the wall hanging department. It must be small. No new knitting allowed. It must use up lots and lots of buttons. If possible, it must be something I could enter into a quilt show.
I cut a piece of cotton fabric, two feet square. What a shock! It looked so small after that 40 x 40 inch snowflake. Here is the knitting I found in my recycle stash: three different black and white sweaters (perfect for August’s Project Spectrum) and part of a red sweater. You can probably see the fusible interfacing already on the knitting.
Hearts are one of my favorite motifs, so the red is for a heart and the background will be black and white. This is the first night’s progress: I pieced the heart and sewed it to the foundation fabric.

Heart Buttons and Trim

We had a buttons session with the heart wall hanging. My girls tested various black and white button combinations on the piece. It’s fascinating to me how buttons and beads can change the character of a design. I like to use them as part of the design, to accentuate borders or patterns.
I also like to hide buttons in patterns or against a same-color background. This adds a subtle visual interest that most people seem to like a lot. When they find a hidden button, it’s like finding a treasure.
You may be able to make out the crochet trim I made for a border around the outside of the quilt. It will look good, once it is sewn down. Well, the next step was to crochet a red trim to go around the heart. I crocheted a short length of spiky trim, so I could see how it would look.
It didn’t look good.
I tried a plain trim. It didn’t look good.
Clearly, the plan in my head wasn’t going to work in real life.
This sounds frustrating, but this is my favorite part of doing wall hangings. I love the challenge of blending or accentuating borders and patterns within a piece. I love to see how my mental picture compares to the real-life picture.

I spent a pleasant evening trying different trims around the heart. This pleated trim won. It softens the transition from the brilliant red to the black and white. It is sheer, so you can see the patterns behind it, which helps the transition. Now the inside of the trim was pretty stark against the red heart, so I sewed red baby rickrack on top of the edge of the pleated trim. Again, it blurs the border between the white trim and red heart.

Wall Hanging Photography
If you want to enter your work into quilt exhibitions or fiber art shows, you have to have a set of good slides. It’s probably best to hire a professional photographer to make your slides, but this can be a problem if you push everything to the last minute, like I often do. I’ll be sending slides in for the Fiber Art International exhibition put on by the FiberArt Guild of Pittsburgh. If the work isn’t accepted into that show, I will have time to enter it into a quilt show.

So today was photography day. Mid-morning is a good time for me to photograph stuff against the old dairy barn. The sun is at an angle that produces fewer shadows, yet still gives bright, white light to photograph by. It’s not the best setup ever, but it will do for the moment.
Here is my makeshift photo studio: the camera to the left, and the wall hanging on the barn. Professional slides have neutral backgrounds or no background at all. I crop out everything but the wall hanging, using silver slide tape. Luckily the sides of this piece are more-or-less straight.
Someday, someday, when our new house is finished, I will have a big blank wall, where I will hang a mottled gray or cream canvas backdrop, and arrange studio lights to illuminate my work for photography. But until then, the morning sun will have to suffice!
Freeform Crochet Underwater Crochet Sample
Hurray for the Taos Wool Festival! All my classes are running, and I am very pleased. I promised samples for the “Freeform Knit or Crochet an Underwater Scene” workshop. Here is the crochet scene in progress, along with the inspirational picture, from my favorite fish book, Reef Fish Identification, by Paul Humann.
I like to sketch a life-sized version of the picture, with notes about what is in the foreground and in the background. That helps me size the crochet correctly.
It’s important to distinguish fore- from background, because you can use the knowledge to add dimension to the piece. That’s what I’m going to do with the big brown section. It is the background to a frilly sort of seaweed, which I will crochet separately. Stay tuned for more pics as this sample progresses.

Eva has been making doll hair from some of my decorative threads. Here are her dolls, made with pipe-cleaners, wooden beads, and yarn.

New Wall Hanging Underway and More

These are cute, aren’t they!?! I used bedspread cotton with a number 2 steel hook. They are for a Black, White, and Red-All-Over wall hanging that I have been planning for a while. Hope to post the beginnings of that pretty soon.
I have a little sewing to do. We stopped by Hobby Lobby on a trip to Austin and bought fabric for a couple of school outfits for Eva, and an outfit for Ella. Fabric is so much fun. I wish I could sew all their clothes, but then there wouldn’t be time for knitting and crocheting!
New Yarn in the House and Kids’ Projects
Last week we were in the neighborhood of Twisted Yarns, and lovely yarn shop in Spring, Texas. Naturally, we dropped by. I need a particular color of light violet, maybe mauve, for a class sample. Manos del Uruguay had the perfect shade, so I had to buy it.
I couldn’t resist the temptation of Nicki Epstein’s new book, Knitted Flowers. It’s beautiful and imaginative, as all her books are. This yarn, a merino tape, appealed to the very fiber of my being! It stunned me. “Mom, buy it!” Eva said. Who am I to argue with such wisdom? So here it is, making me happy just because it exists. It is called Tagliatelli, color “Burnt Ochre,” by Colinette.


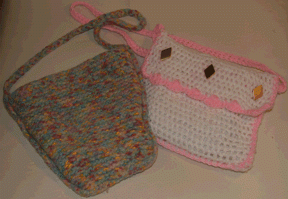
The children of the house have been busy. Eva (almost 11 years old) crocheted this pretty purse and lined it. She also finished a felted purse project that has been dragging on for too long. It is garter stitch, and it grew wider as she knitted. Fortunately, the accidental shaping was perfect for this little bag. She was fascinated, as I knew she would be, at the felting process. The bag is about 2/3 of its original size.
Three-and-a-half year old Ella wants to knit so much! She has made up her own brand of knitting and crocheting.. She “knitted” a sweater for a tiny teddy bear by winding the yarn around him. Here’s her latest “crochet” creation, made all by herself. It’s a fairy lollipop.

Catching Up with Project Spectrum

Where did June go? For that matter what happened to May? Can it be possible that we’re more than halfway through July? Project Spectrum has gotten way ahead of me, which is odd, since I love color and think about it and study it and experiment with it almost every day.
Let’s see if I can recover. Alright. May’s color was green. In May, I made a workshop sample that had a lot of green in it. Purple is July’s color, and I’m declaring the Snowflake wall hanging my July project.
I’ve always wanted to recycle blue jeans into a wall hanging or garment. A dear neighbor recently gave me a pile of old jeans. This must be a sign that it is time to get on with my jeans project! I’ve been sorting and trimming them. The buttons are so great, with the jeans logo stamped into them, that I saved them. Here they are, in recognition of Project Spectrum and my someday, sometime blue jeans project.
Starching Leaves
My crocheted leaves looked like green squiggles. You had to stretch them out and hold them with three hands to see their shape. The sunflower petals were wiggly and bent even after a steam treatment. Hmm… Wonder if I could starch them? Wouldn’t hurt to try.

I mixed up some laundry starch, about half the strength of the recipe for the doilies (see One Way to Starch a Doily). I dunked the pieces, squeezed them out, pinned them to cardboard, and let them dry in the sun. It worked! The wool leaves are still flexible, and they feel fine—you know, still soft. The synthetic leaves (Kelly green) dried a lot stiffer than the woolen ones. Maybe they soaked up more starch. Don’t know.
The sunflower is heavier than the leaves and the stitches are a lot looser. So far, the petals are staying straight. A couple of them look like they might squiggle back up any minute. Next time I do this flower, I’m going to use thinner yarn and tighter stitches. And maybe stronger starch.
Ludlum and Button Sewing

Fantastical situations, heartless undercover men with heart, impossibly beautiful women (who help the heartless men discover their hearts), long and undoubtedly accurate technical descriptions of military equipment, incredibly complex conspiracies that require hundreds of people to operate with unerring efficiency and keep their mouths shut, formidable enemies who have terrible aim: such are the elements of a Robert Ludlum novel. Oh, how I love to listen to these novels on tape.
The tape of the moment is The Janson Directive, read by actor Paul Michael, who is good at accents: Russian, Indian, several kinds of British, New England, and more. It’s fun to hear him. The reading lasts through 28 sides of audiotape, and it’s a good thing, because the Snowflake wall hanging had lots of buttons and beads for me to sew. I also had to do quite a bit of seam reinforcement and some repair to the knitting by hand.
Now the wall hanging is as finished as it is going to get. I experimented with more buttons, but it is at a point where more embellishment detracts from the effect. It’s time to quit. Hurray!
I’m declaring this wall hanging as my July Project Spectrum contribution. July’s color is purple.

In other creative doings around the house, 10-year-old Eva gathered burr oak acorns and gave them faces and hair. She called them ‘talking heads,’ and told her sister that if she were lonely, she could talk to one and it would make her feel better.
One Way to Starch a Doily


These little pieces came in a tin I bought at an antique store. They were dirty and smelled of pipe tobacco. These scans show before cleaning and starching and after cleaning and starching. Isn’t the difference amazing?!
Careful starching is part of the finishing process for these decorative pieces and also for small things like bookmarks and crocheted snowflake ornaments. It is some trouble, but thank goodness, you only need to starch after a piece has been finished or washed.
My first step was to wash those dingy things. Ivory Liquid is a favorite gentle cleanser among a lot of textile and fiber folks. But I didn’t have any Ivory, so I washed these in shampoo. They still looked dirty, so I tried a brightening wash:
- Half-fill the bathroom sink. Add a handful of borax powder.
- Swish doilies around and let them soak a few minutes.
- Rinse in running water.
- Run another half-sink or water. Add about 2 Tablespoons of lemon juice.
- Soak and swish doilies again.
- Rinse again in running water.
- Lay flat to dry, preferably in sunshine.
As you read the next steps, take it from someone who has learned this lesson in the school of experience: lazy methods produce inferior results. With that in mind, prepare for starching:
- Lightly stretch the doily and measure its dimensions. For a round doily, measure across. For a square, rectangular, or oval doily, measure length and width.
- On a piece of parchment paper or wax paper, use a pencil or waterproof pen to draw the shape of the doily to be starched. Leave a wide border around the drawing. For round doilies, trace around a plate or platter that is about the right size. For squares, rectangles, and ovals, use a ruler to measure and draw an outline.
- If your round doily is obviously divisible into quarters, fold your circle drawing into quarters, with the center of the fold at the center of the circle. This will give you guidelines for evenly pinning your doily.
- Tape the drawing to a piece of cardboard. Find a bunch of pins.
You can use your eye to estimate the lines if you want, but I guarantee you will have a better product if you take the time to draw the lines.

Now prepare the starch. I use Faultless powdered starch. My supermarket has these old-fashioned boxes alongside the spray starches. These proportions will make your doily fairly stiff, as you can see in the photo below. There’s plenty here to do several medium sized doilies.

1/2 c water (4 fluid oz.)
1 1/2 Tablespoons (1 T + 1-1/2 tsp) laundry starch
1/4 c water
1 c cool water
Mix starch powder into 1/4 cup cool water until smooth. In a small saucepan, bring ½ cup water to a boil. Remove from heat and slowly stir starch mixture into hot water. Add cool water and mix well. Let cool.
OR make sugar starch with 1 part water, 2 parts sugar. In a saucepan, heat and stir water and sugar until solution is clear. No need to boil. Let cool.
Make doily wet and squeeze out excess water. Put doily into the starch solution (laundry starch or sugar starch). Let stand for a few minutes. Remove from starch solution and squeeze out excess.
Pin doily onto the cardboard, using the drawn lines as a guide. My drawn circle was a fraction too small, so I pinned each loop just outside the line all around. For best results, pin each point or loop in place. Take time to straighten and smooth each flower petal. (Go back to the top and compare the flower centers, before and after.)

In the picture marked “NO,” the loops have not been pinned. They’ll dry like that, and the outside of the doily will look crumpled. You can see the penciled line I used for a guide.

In the picture marked “YES,” I pinned all the loops. It takes longer, but the results are worth it.

Here are my three all pinned and drying.
Let the piece dry completely. Remove the pins, and enjoy your beautifully finished doily!

A few more notes:
Do not iron flat doilies. There’s no need to do that, in spite of information presented on other websites.
For doilies with large ruffles, make some kind of support for the ruffles, like cones made by rolling paper and taping. Once the ruffled doily is dry, you may need to touch up the ruffles with the iron. I’m talking about the ruffles that stand a couple or three inches high. These doilies were popular at one time, I guess when people had more time for starching!
I have read about spray starching doilies and similar pieces. I have never done this. My concern is that the spray starch wouldn’t penetrate the piece like the liquid starch does.
In my experience, sugar starch does not attract ants. I sugar-starched some snowflakes over twenty years ago, and they have been ant-free all this time.
Commercial fabric stiffeners are available at craft stores, under brand names like Stiffy. They are like white glue, and they do a good job. I think pieces stiffened with commercial stiffeners have a bit of a translucent look, almost as if they are still wet. Starch and sugar give a fine, dry-looking finish to cotton thread.


