
How is Crochet Garden Different from Crochet Bouquet?

Beth, a friend from Ravelry, sent me this message, and it was a great opportunity to get on my soapbox. Thank you, Beth! The soapbox is one of my favorite places!
Was wondering – about your Crochet Garden book, are there lots of new patterns in your new book, please? How would you describe the book in relation to its predecessor?
All the very best
Beth
Hi Beth!
Crochet Garden has all new flower patterns. I’d say it is very focused on its four themes:
-
Botanical Garden (realistic flowers)
-
International Garden (flowers with a tie to various countries around the world)
-
Inspired Garden (flowers interpreted from decorative arts like embroidery, weaving, chinaware)
-
Fun and Fantastic Garden (imagine “Candy Cornflower,” “Imp Flower,” and “Frost Flower”)
It also has a few leaves, a peacock, a butterfly with variations.
Crochet Garden reintroduces a vintage crochet stitch, the Russian Spoke Stitch. The Tole Tulip (shown above) and the Twirl Center Rose are noteworthy for their unusual and cool construction.
Thanks for asking!
Suzann
European Rose Featured at Lion Brand

Lion Brand Yarn Company provides the pattern for our May 2012 Crochet Along! The European Rose from Crochet Garden is featured at Lion Brand’s website, with free instructions, step-by-step photos, and some hints for easier crocheting.
The white Yorkshire Rose was my original inspiration for this flower, but by changing the petal colors, you can also make a Lancashire Rose (all red petals) or a Tudor Rose (white petals inside, red petals outside). When my mom saw this design, she said, “Oh, it’s a Martin Luther’s Rose!”
Then I saw it in a book, under the name “Alchemical Rose.”
It’s a rose by many other names.
Russian Picot Daisy Step by Step

Alternating treble crochet and single crochet gives the Russian Picot Daisy’s center its bumpy surface. Crocheting a trc immediately after a sc can be a little awkward, but you’ll soon get used to it. Try to bend each trc toward the front of the work as you begin the next sc. If some trcs bend toward the back, just push them out toward the front with your finger.

The petal round is where the fun begins. We make the vintage Russian Spoke Stitch that I described in my last post, and we turn it into a picot or shell-shaped petal.

It’s been over a year since I designed this flower for Crochet Garden. Since then I figured out a way to make the stitch a little easier. After you ch 7, insert a safety pin into the last ch st, which is on your hook (see Photo 2). You’ll come back to this later.

Working along the chain, * insert your hook underneath the chain, yarn over, and pull up a loop as in Photo 3.

Yarn over again and pull the yarn through one loop only, as you see in Photo 4. * For this particular flower, repeat between the *s 13 more times.

After you have sl stitched into the next st of the round below, you’ll have 16 loops on your hook: the ch st with the safety pin in it, 14 loops of the spoke stitch, and the sl st. (See Photo 5.)

Yarn over and draw the loop through all the loops on the hook. When you’re done, it will look like the tall double-bullion-like stitch in Photo 6, which is the complete Russian Spoke Stitch.
To continue to the picot, with your hook still in the loop, pull the yarn in the direction of the arrow you see in the photo. Pull until the tall stitch bends over double, creating a plump picot.
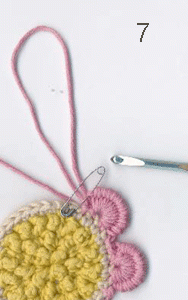
Secure the new picot with a sl st in the next st of the round below. Sl st again, then pull the yarn loop out as in Photo 7. Take your hook from the enlarged loop. Insert the hook into the loop with the safety pin in it. Remove the safety pin. Insert the hook into the enlarged loop and tighten the loop around the hook. Draw this loop through the loop that once had the safety pin in it.
You just finished a Russian Picot! To begin the next picot, sl st into the next st of the round below.
The Russian Picot requires 4 sts of the round below:
- Sl st into the round below, before you crochet the long chain.
- Sl st into the round below when you have finished covering the chain with loops.
- Sl st into the round below to secure the picot.
- Sl st into the round below before you stitch down the outer corner of the picot.
Russian Spoke Stitch Resurrected

The Russian Spoke Stitch and the Russian Spoke Picot were invented by a lady named Olivia Longacre Wertman to mimic the look of Russian darning. Here’s an example of Russian darning on a net tablecloth that my grandmother, Gertrud Wirth, embroidered a long time ago.
Mrs. Wertman’s instructions (with very good step-by-step photos, by the way) were published in 1900. You can read them free of charge on Google books–just search her name. Look under the title “Relief Crochet.”

When I first read about the Russian Spoke Stitch and the Picot, I thought, “This is so clever! Why haven’t I seen this before? Why hasn’t someone resurrected this stitch? Why isn’t anyone teaching about it? Why aren’t they publishing cool patterns with it?”
As these questions hung in the air, a revelation arrived, and stood there tapping its foot. “Hello-o-o-o-o,” it called. “Anybody home? Coo-ee! Suza-a-a-a-annnnnn, are you there?”

Oh! Wait a minute! I get it! Could the person who resurrects this stitch be…me? How about if I teach about it? Could the person who publishes cool patterns with this stitch be me as well?
“Um, yeah. Okay. Sure,” said the revelation, rolling its eyes. “About time.”
So, this is what we have so far:
- The Russian Spoke Flower in Crochet Garden: pages 100-101. It’s the pink flower above.
- The Russian Picot Daisy in Crochet Garden: pages 76-77 (the lavender and purple flower above). Both flower samples are crocheted with Cascade Yarns Cascade 220.
- An opportunity to learn how to do these stitches in my class “Full of Bullion (Stitch, That Is)”at the Knit & Crochet Show (Instructions for the crocheted insertion below are in the class hand-out.)
-
A how-to article and gorgeous capelet pattern in an upcoming issue of Crochet! magazine.
UPDATE: “The Double Bullion: A New Take on a Vintage Stitch,” Crochet! pp. 22 ff., Vol. 25, No. 3, Autumn 2012. Shoulder wrap pattern: “Purple Haze Shoulder Scarf,” Crochet! pp. 24 ff., Vol. 25, No. 3, Autumn 2012.
- And a Russian Picot Daisy Tutorial, soon on this blog.
Now I look forward to seeing what you do with these new/old stitches!

Free Crochet Pasque Flower Pattern

Many pairs of eyeballs looked at Crochet Garden before it went to press. All off them missed the fact that the lovely Pasque Flower was on the cover (the yellow flower, second from right), and on the copyright page (purple and yellow) but not in the book!
It’s embarrassing, but what can we do?
We can give you the pattern free!
Pasque flowers look delicate with their pretty petals and oversized centers, but they are hardy enough to grow in mountainous places.
Skill Level: Easy
Materials and Tools
- 2 or 3 colors of yarn of similar weight: yellow for center (A), one or two shades of purple or yellow (B and C); eyelash yarn is a good alternative for the flower center
- Hook: Appropriate size hook to achieve a firm gauge with selected yarn
- Tapestry needle
For this flower we used
Cascade 220 Wool (100% Peruvian Highland wool; 3.5oz/100g = 220yd/200m): (A) color Yellow #2439, (B) and (C) color violet #8888, medium weight yarn; <4>
Gauge Circle for Cascade 220 (see page 11 of Crochet Garden) = 1 1/8″/2.9cm worked on 4.00mm (size G-6 U.S.) hook
Finished Measurements using Cascade 220: 4 7/8″/12cm
Special Abbreviations
- Htr (half treble crochet): Yo 2 times, insert hook in stitch and draw up a loop (4 loops on hook), yo and draw through 2 loops (3 loops on hook), yo and draw through 3 loops (1 loop left on hook).
- Long Picot: Ch 3, hdc in 2nd ch from hook, sl st in remaining ch.
Instructions
Flower Center:
With A, ch 4, join with sl st in first ch to form a ring.
- Rnd 1: Ch 1, 6 sc in ring, join with sl st to first sc of rnd.
- Rnd 2: Working in FL only , (sl st in next st, Long Picot) 6 times.
- Rnd 3: Working in BL of rnd 1 only, sl st in next st, *Long Picot, sl st in same st of Rnd 1; (Long Picot, sl st in next st of Rnd 1) twice; rep from * once, Long Picot, sl st in same st of Rnd 1, Long Picot, sl st in next st of Rnd 1, Long Picot, join with sl st in base of st at beg of rnd–9 picots. Fasten off, leaving a long tail for sewing.
Alternative Flower Center:
With eyelash yarn, ch 4 and join with sl st in first ch to form a ring. Ch 1 and fill the ring with sc OR ch 2 and fill the ring with hdc, whichever works best with your flower. Join to beg of rnd with sl st. Fasten off, leaving a long tail for sewing.
Flower:
With B, ch 4, join with sl st in first ch to form a ring.
- Rnd 1: Ch 5 (counts as 1 dc and ch-2 sp), working in ring (dc, ch 2) 5 times, join with sl st to 3rd ch of ch-5 at beg of rnd.
- Rnd 2: *Sl st in next ch-2 sp, ch 3, (3 dc, ch 3, sl st) in same ch-2 sp; rep from * 5 times—6 petals.
- Rnd 3: Sl st in each st of ch-3 at beg of rnd 2; *ch 3, dc in first dc, (2 htr) in next dc, dc in next dc, ch 3, sl st in top st of ch-3 of row below, ch 1, sl st in top st of the ch-3 at beg of the next petal; rep from * 5 times. Fasten off and weave in ends before continuing to rnd 4.
- Rnd 4: Join with B or C as desired. Hold yarn at WS of flower (underneath it), insert hook in first ch at the base of any petal, yo and pull a loop through to the RS of work (first sl st complete). *Sl st in each of the rem 5 ch up the side of the petal (1 ch will have a st in it already, so do your best). Across the top of the petal, (sc, hdc) in first st, (dc, htr) in 2nd st, ch 2, sl st in 2nd ch from hook, (htr, dc) in next st, (hdc, sc) in next st, sl st in each of the 6 ch down the side of the petal (1 ch will already have a st in it), sl st in ch-2 sp of rnd 1, sl st around the next dc of rnd 1, sl st in first ch at base of the next petal; rep from * 4 times. Rep from * once more, except end with the sl st around the next dc of rnd 1. Fasten off and needle-join to first sl st of rnd.
Finishing:
Weave in ends (except end for sewing) and block the flower gently. Sew flower center to the middle of the flower on the RS.
Polymer Clay Button Cloth

Polymer clay buttons are so much fun to make! They’re colorful and pretty. They’re machine-washable and dryable. Button-lover that I am, I have enjoyed making these little beauties since the 1980s, which adds up to lots of buttons. How can a person display buttons? A button cloth!
Since there were so many colors of buttons, I needed a colorful button cloth. Borrowing a color-meandering technique from quilter Jinny Beyer, I arranged the hues of the rainbow in different shades and tints.


Using the wonderful Ultimate Sweater Machine, I knitted blocks of color, alternating with cream and white. To join the strips of blocks, I used the join-as-you-knit method. Black and gray run along the long margins of the cloth.

After blocking the knitting, I added quilt batting and fabric backing. Then I quilted it and added binding all around.
It was time to sew buttons onto the cloth! It took a long time to work through my backlog of buttons. After that, whenever I made a new button style or colorway, I sewed a sample onto the cloth right away.
It’s such a fun piece to show. I always take it to my button workshops. People are surprised to learn that all the colors are the colors of the clay—no paint!
Topsy Turvy #2 Crochet Bouquet Along for April 2012

You’re spoiled for choice by the Topsy Turvy #2 flower on pages 95-96 of Crochet Bouquet. You can crochet it small, medium, or large; with or without picots; one way up or the other way up, all in two short pages of instructions.
The shading in Chinese embroidery was part of the inspiration for this design, which is why I crocheted the samples in the book in light, medium, and dark values of the same color. It will look good in other combinations, too, like this yellow-orange-red combination.

I crocheted these samples with Dale of Norway “Falk”washable wool. The Topsy flower has picots and the Turvy flower doesn’t.
In Photo A, you see the beginnings of both flowers: the first row or two of the flower, the stems which are slightly different, and the crocheted round that I used for embellishment. If you sew the flower to the stem at this point, it makes a cute bud.
To make the embellishment, make a loop with yarn, 5 or 6 sc into the yarn ring. Tighten ring to form a circle, cut yarn and needle-join the last st to the first. Weave in ends or use them to sew the embellishment to the flower.

If you like the flower without picots, you simply leave out certain rows, as indicated in the instructions. Photo B shows the picot flower with Row 4 finished, and the plain flower with Row 3 finished (Rows 2 and 4 are skipped). I couldn’t wait to sew the embellishment on the plain flower. You can stop here, if you want a smaller flower.

The calyx (the green spikes that are leftover from the bud of a flower) and the stem are made in one piece. To attach to the Topsy flower, thread the stem through the original chain loop, from front to back. Fold the calyx over, and sew it to the stem, which is coming out of the back of the flower. See Photo C.
To Button or Not To Button?
I had to smile when I read this comment from an Amazon.com reviewer, about Crochet Bouquet.
And why are so many decorated with buttons? No, no, no, no, no.
Truth be told, we are fortunate that there were so relatively few buttons in Crochet Bouquet. I held back on the buttons. I restrained myself. It wasn’t easy. Like I said, we’re lucky there weren’t more.
Why?
Because I love, love, love, love, LOVE buttons! They make me feel rich! They add interest and weight to my designs! They are cool to the touch when you run your fingers through them, and they make a nice, soft, clicking-clattering noise when you pour them out of the button jar. They come in so many varieties, it seems one will never run out of buttony options.

You can see for yourself the buttons that embellish some of the flowers in Crochet Bouquet. (There will be a few button embellishments in my new book, Crochet Garden, too.) Let me show you some of my other buttony creations.
The heart wall hanging above is my “Newspaper Valentine.” (Three guesses as to why it is called that–think back to your childhood.) In addition to the many buttons used as trim and hidden in the background, I created stylized flowers on the heart using black and white buttons. (Thank you Sharon, for the buttons!) Bandanna designs inspired these button flowers. If I remember correctly, “Newspaper Valentine” has over 200 buttons on it.

My friend Kipling McFarland and I are working on a project together, and this is one of the designs I made for it. It’s called “Money Tree.” Remember how I said that buttons make me feel rich?

The black buttons on the ladybug wall hanging were meant to echo the spots on a ladybug’s carapace. I think there are nearly 90 buttons on this wall hanging, and I was very disappointed at the time that the level of buttons in our button jar didn’t seem to be affected by the loss.
I make buttons, too. This is the button cloth I created to take to my button workshops. It is knitted on my trusty Ultimate Sweater Machine, added to batting and a fabric backing, and machine-quilted. I sewed a sample of each different kind of polymer clay button I have made onto the button cloth.
There’s oh, so much more. If you are interested, you can find more buttony projects throughout my blog and website.
I’ll close with this happy thought: I can love buttons and use them on everything, and you can choose
- to cover everything with buttons, like me (yes, yes, yes, yes, yes),
- to use a moderate number of buttons (yes, yes, maybe, no, no),
- to use buttons sparingly (yes, maybe, no, no, no),
- or never to use buttons at all (no, no, no, no, no).
It’s a win-win situation!
Corner Buttoned and Bound

What do you think of this neat, mitered corner?
My quilting friend Peggy showed me how to sew a continuous binding on a quilt, which miters on the topside and underside of each corner. Thanks, Peggy!
This is my first try, and it’s much quicker than my old binding method. It went pretty well, though I may not show you every single corner up close and personal. Peggy prefers a narrow binding, but I like mine to be wide enough to frame the wall hanging.
After sewing on, taking off, rearranging, and resewing several motifs, the lower right corner of my Valentine quilt may be finished.

Green Socks and Blue Bonnets

Sock season is almost at an end in our part of Texas. It was cool enough this morning for me to wear my latest handmade pair while out running errands and grocery shopping with my mom. After that, I had to change to flip-flops.
The yarn is Coats & Clark’s Heart and Sole with Aloe. It’s lovely to knit and seems to speed my knitting along. It also feels very nice on my feet. Maybe the aloe is responsible. The colorway: Green Envy. Eva has already succumbed to the green envy. She ordered a pair of her very own for her next birthday.
The bluebonnets are in our front yard. It’s such a pleasure to go outside these days.


