
Alternating treble crochet and single crochet gives the Russian Picot Daisy’s center its bumpy surface. Crocheting a trc immediately after a sc can be a little awkward, but you’ll soon get used to it. Try to bend each trc toward the front of the work as you begin the next sc. If some trcs bend toward the back, just push them out toward the front with your finger.

The petal round is where the fun begins. We make the vintage Russian Spoke Stitch that I described in my last post, and we turn it into a picot or shell-shaped petal.

It’s been over a year since I designed this flower for Crochet Garden. Since then I figured out a way to make the stitch a little easier. After you ch 7, insert a safety pin into the last ch st, which is on your hook (see Photo 2). You’ll come back to this later.

Working along the chain, * insert your hook underneath the chain, yarn over, and pull up a loop as in Photo 3.

Yarn over again and pull the yarn through one loop only, as you see in Photo 4. * For this particular flower, repeat between the *s 13 more times.

After you have sl stitched into the next st of the round below, you’ll have 16 loops on your hook: the ch st with the safety pin in it, 14 loops of the spoke stitch, and the sl st. (See Photo 5.)

Yarn over and draw the loop through all the loops on the hook. When you’re done, it will look like the tall double-bullion-like stitch in Photo 6, which is the complete Russian Spoke Stitch.
To continue to the picot, with your hook still in the loop, pull the yarn in the direction of the arrow you see in the photo. Pull until the tall stitch bends over double, creating a plump picot.
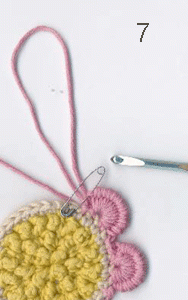
Secure the new picot with a sl st in the next st of the round below. Sl st again, then pull the yarn loop out as in Photo 7. Take your hook from the enlarged loop. Insert the hook into the loop with the safety pin in it. Remove the safety pin. Insert the hook into the enlarged loop and tighten the loop around the hook. Draw this loop through the loop that once had the safety pin in it.
You just finished a Russian Picot! To begin the next picot, sl st into the next st of the round below.
The Russian Picot requires 4 sts of the round below:
- Sl st into the round below, before you crochet the long chain.
- Sl st into the round below when you have finished covering the chain with loops.
- Sl st into the round below to secure the picot.
- Sl st into the round below before you stitch down the outer corner of the picot.