A Trip to Austin

Charles had to pay a visit to the Geology Library at UTexas, so he said, “Want to go to Austin for a day?” I considered for about a zeroth of a second, and said, “Yes!” My plan? To spend some time communing with the fibers that be at Hill Country Weavers, 1701 S. Congress Avenue, Austin, TX.
I spent a blissful hour and a half looking at yarn and books, and then looking at the yarn all over again. An employee saw me looking at Rachael Matthews’ Knitorama. We both agreed that it is a very silly book, and we both love it! The “Yarn Foreword,” an introduction by Amy Plant brought on nostalgia. She advocates knitting with a lovely cup of Yorkshire tea at your side. I did that many times when we lived in England. Yorkshire tea is delicious.

Hill Country Weavers is in a converted house. Every nook and cranny is filled with yarn. I was glad to see Habu Textiles well-represented. Their yarns are imported from Japan. I knitted a shawl/poncho with their linen paper yarn. It is interesting stuff.
Beautiful yarns from small producers, like Judy & Co. and the Great Adirodack Yarn Co., are featured at Hill Country Weavers. Alongside them are the old standards: Cascade 220 in its many colors, crisp Euroflax Linen and ethereal KidLin, Brown Sheep Yarns, and Tahki Cotton Classic, which is one of my favorite yarns ever, because of the color choice.
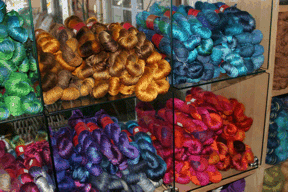
This display of Alchemy Yarns stopped me in my tracks. The colors were so saturated, so brilliant, that I wanted to dive in! I love that they use the same colorways on different types of yarn (silk straw, mohair, silk, bumpy yarn).
I bought a few things and made notes about many others for future projects. Stella, the shop doggie, checked on me every now and then, to make sure I was getting along alright.
Another book caught my eye: The Museum of Kitschy Stitches, by blogger Stitchy McYarnpants. The author makes sometimes funny, sometimes mean comments upon ridiculous knit and crochet designs of the past. Some of the fashions are truly terrible. The worst part: I can remember when many of those patterns were originally published!

Cosmic Peacock: The Coat

A fellow member of the Incredible Sweater Machine list on Yahoo remembered my Cosmic Peacock coat from 1997. Another fellow member asked for pictures, and I am extremely flattered and honored to oblige! The coat toured with the 1997 Fairfield Fashion Show, which was sponsored by the Fairfield Processing Company (manufacturers of quilt batting, stuffing, and other fine crafting products).

Here’s the story I wrote, to be read during the fashion show. Much of it is meant to acknowledge the sponsors. The heart of the story is in italics.
Which came first—the peacock or the egg? There’s no doubt, says Suzann Thompson, the peacock did.
She used Style pattern 2551, adapting it to a peacock feather motif. She charted the feather design for knitting, with Cochenille Design Studio’s Stitchpainter Gold. Using Harrisville Designs’ Highland Style 100% wool, she knitted the outer coat fabric on an Incredible Sweater Machine from Bond America. She quilted the knitted fabric with Poly-Fil Cotton Classic batting and embellished it with Prismatic Foil from Meryl Ann Butler Studios, buttons from Blumenthal Lansing, ribbon from Offray, and threads from Sulky of America and Coats & Clark. The coat’s binding is Jigsaw ribbon from Offray.
Our cosmic peacock was looking pretty handsome by this time, with his sparkles and buttons and trims. He caught the eye of a discerning cosmic peahen, and it was love at first sight. She laid a couple of Prismatic Foil eggs in the inky darkness of Rosebar’s Iridescent Taffeta, which lines the coat. The eggs are trimmed with Offray ribbon, and appropriately, baby rickrack by Coats & Clark.
The trousers, McCall’s pattern 8576, are also of Rosebar’s Iridescent Taffeta, trimmed with Offray ribbon, and assembled with thread and a zipper by Coats & Clark.
Nowadays the show is sponsored by Bernina Sewing Machine Company. The garments tend to reflect the change of sponsorship. They are much more floaty, and a lot of the designers go wild with machine embroidery. The show opens each year at the International Quilt Festival in Houston, Texas, and travels around the US and sometimes overseas. If you ever have a chance to see it, do. It is wonderful.
Crochet Trim for Wall Hanging

Some red wool that’s been in my stash for at least a dozen years finally gets its chance to shine! It’s the perfect weight for crocheting a trim for my heart wall hanging. Here it is, mostly done. It will go around the outside of the piece.
Two posts back, I said that the wall hanging looks different in the photo than it does in real life. Woolwinder asked, “How does it look different?” First, the piece looks crisper in the photo. In real life, you see the fuzzy yarn and the texture of the stitches and the sewing. The camera flattens everything out. Also the flash seems to brighten the white, which gives the whole thing more contrast.
The other thing is that I had been working on the piece on a smaller level: cutting the patches, piecing them, sewing each patch. So my eye was seeing things up very close. The photo shows the whole piece, and you can’t really even see the separate patches. It’s a perspective shift, which catches me off guard.
Looking Back to Ladybug
Last year around this time, I finished a little wall hanging. I wrote up the story of its inspiration and sent it to a publication which required that the images and words not be published anywhere else. My story was rejected (don’t feel sorry for me—it’s a fact of life for writers). Now it’s time to show it off!

It’s all knitted on the Ultimate Sweater Machine. I stabilized the pieces with fusible interfacing, trimmed and cut pieces to fit, and machine embroidered the daisies. For the ladybug, I cut a ladybug shape from red, then cut a ladybug-shaped hole from the green background, and set the red piece in. All pieces are sewn to a lightweight cotton background. I added rick rack.
Joy of Joy’s Fabrics in Stephenville, Texas, helped me choose a black and white gingham for backing and binding the piece. Then I quilted the whole thing, bound it, and sewed on buttons.
I teach a workshop called “Small Quilt from Your Old Sweaters,” which covers the techniques I used on the ladybug wall hanging. You don’t even have to know how to knit.
All Pieced and Maybe Ready for Quilting

Here’s the heart wall hanging with its background in progress. The three thrift store sweaters worked well together. I just cut random pieces and pin them in place. Sometimes I have to cut a certain shape, like around the curves of the heart, or between two pieces already in place. Mostly I try to have the knitting going in different directions, and similar pieces spaced apart from each other.
This piece is so beautifully small, that it took me only three late nights to piece the whole thing! And here it is. You would be surprised to see it in real life. It looks so different than it does in the photo. Is it the scale that makes the difference?

It is probably ready for quilting. Luckily I need to buy some fabric for the back, so I have a few days to decide. After quilting and binding, I’ll add trim and buttons and try to make some sense out of this chaos.
Crochet and Solar Clothes Dryer

Some people say this weather is dry and hot and sunny. I say it’s dry, hot, sunny, and perfect laundry drying weather! With all the free solar energy shining down on us, I can’t stand the thought of running the dryer, which uses propane and adds more heat to what we already have.
So we have a clothes line. It’s a little short, so I sometimes hang clothes from other clothes. Today’s laundry included crochet heart placemats, which my friend Vickie made as a wedding present for us over 19 years ago. We use them almost every day and they still look great.

In the 1980s, Vickie made heavy crocheted rugs from strips of fabric. She tore the strips from lengths of cotton fabric, and she had to remove the selvedges. Our heart placemats are made from those selvedges.

I haven’t seen Vickie in years, and I don’t know where she is. I hope she might read this someday and know how much we have enjoyed her gift of crochet.
Meanwhile, as long as this weather lasts (which will be a long time here in Texas), I will enjoy hanging out the laundry. It reminds me of simpler and slower times, though the drying time is anything but slow. Sheets usually dry in about seven minutes. Someday, I’m going to make myself a solar oven.
August Project Spectrum Project

After the long-long lasting snowflake project, I wanted to do something quick in the wall hanging department. It must be small. No new knitting allowed. It must use up lots and lots of buttons. If possible, it must be something I could enter into a quilt show.
I cut a piece of cotton fabric, two feet square. What a shock! It looked so small after that 40 x 40 inch snowflake. Here is the knitting I found in my recycle stash: three different black and white sweaters (perfect for August’s Project Spectrum) and part of a red sweater. You can probably see the fusible interfacing already on the knitting.
Hearts are one of my favorite motifs, so the red is for a heart and the background will be black and white. This is the first night’s progress: I pieced the heart and sewed it to the foundation fabric.

Heart Buttons and Trim

We had a buttons session with the heart wall hanging. My girls tested various black and white button combinations on the piece. It’s fascinating to me how buttons and beads can change the character of a design. I like to use them as part of the design, to accentuate borders or patterns.
I also like to hide buttons in patterns or against a same-color background. This adds a subtle visual interest that most people seem to like a lot. When they find a hidden button, it’s like finding a treasure.
You may be able to make out the crochet trim I made for a border around the outside of the quilt. It will look good, once it is sewn down. Well, the next step was to crochet a red trim to go around the heart. I crocheted a short length of spiky trim, so I could see how it would look.
It didn’t look good.
I tried a plain trim. It didn’t look good.
Clearly, the plan in my head wasn’t going to work in real life.
This sounds frustrating, but this is my favorite part of doing wall hangings. I love the challenge of blending or accentuating borders and patterns within a piece. I love to see how my mental picture compares to the real-life picture.

I spent a pleasant evening trying different trims around the heart. This pleated trim won. It softens the transition from the brilliant red to the black and white. It is sheer, so you can see the patterns behind it, which helps the transition. Now the inside of the trim was pretty stark against the red heart, so I sewed red baby rickrack on top of the edge of the pleated trim. Again, it blurs the border between the white trim and red heart.

Wall Hanging Photography
If you want to enter your work into quilt exhibitions or fiber art shows, you have to have a set of good slides. It’s probably best to hire a professional photographer to make your slides, but this can be a problem if you push everything to the last minute, like I often do. I’ll be sending slides in for the Fiber Art International exhibition put on by the FiberArt Guild of Pittsburgh. If the work isn’t accepted into that show, I will have time to enter it into a quilt show.

So today was photography day. Mid-morning is a good time for me to photograph stuff against the old dairy barn. The sun is at an angle that produces fewer shadows, yet still gives bright, white light to photograph by. It’s not the best setup ever, but it will do for the moment.
Here is my makeshift photo studio: the camera to the left, and the wall hanging on the barn. Professional slides have neutral backgrounds or no background at all. I crop out everything but the wall hanging, using silver slide tape. Luckily the sides of this piece are more-or-less straight.
Someday, someday, when our new house is finished, I will have a big blank wall, where I will hang a mottled gray or cream canvas backdrop, and arrange studio lights to illuminate my work for photography. But until then, the morning sun will have to suffice!
Freeform Crochet Underwater Crochet Sample
Hurray for the Taos Wool Festival! All my classes are running, and I am very pleased. I promised samples for the “Freeform Knit or Crochet an Underwater Scene” workshop. Here is the crochet scene in progress, along with the inspirational picture, from my favorite fish book, Reef Fish Identification, by Paul Humann.
I like to sketch a life-sized version of the picture, with notes about what is in the foreground and in the background. That helps me size the crochet correctly.
It’s important to distinguish fore- from background, because you can use the knowledge to add dimension to the piece. That’s what I’m going to do with the big brown section. It is the background to a frilly sort of seaweed, which I will crochet separately. Stay tuned for more pics as this sample progresses.

Eva has been making doll hair from some of my decorative threads. Here are her dolls, made with pipe-cleaners, wooden beads, and yarn.
