
Wool and Archeology in San Angelo
My husband went to a Texas Archeological Society meeting in San Angelo, Texas, last weekend. We tagged along, because San Angelo is a quirky and interesting city. It has a small university, a big art community, and attractions like the International Water Lily Garden. It’s big enough to have a lot of commerce, but not so big that you can’t find your way around. You can see a lot of local flavor in the businesses, but the big retailers and food chains are moving in along the loop around the town.
A quick check of the yellow pages revealed a category for “Wool.” West Texas was a big producer of wool and mohair until the government subsidies were removed. Still, for San Angelo and surrounding areas there were a dozen listings under “Wool,” which included:
Ballinger Wool & Mohair
Eldorado Wool Co
Ozona Wool & Mohair Co.
San Angelo Wool Processing
Santa Fe Grading
Sonora Wool & Mohair Co
Southwestern Wool & Mohair Inc
West Texas Wool & Mohair Association
Western Wool & Mohair Co.
Wool Growers Central Storage
You’d think that such a wooly place would naturally have several yarn shops. Nope. The only listing under “Y” is “Youth Organizations and Centers.” No category for yarn, nary a yarn store. Oh, the local Hobby Lobby probably has yarn, but it’s not the same.


San Angelo makes up for this sad lack of yarn by having lots of art and artists. We visited the Chicken Farm Art Center. Among the wonderful painters’, potters’, and batik artists’ studios, we found an artist who works in mosaic. Her name is Mary Swain, and here is some of her work. I love how she uses natural materials among the tiles. This mirror frame has antlers worked into the design. Another mirror frame had fossil snails in the design. Mary coats the finished mosaic with some sealant, which gives all the components a glossy, wet-looking finish, and unifies the design elements. She said that a mirror frame takes her about two weeks to complete.

Mary’s mosaics are featured in other parts of the Art Center, like this step in the Gecko Gallery. She also decorated parts of Inn of the Arts, a bed and breakfast on site.
The Adult Literacy Council was having a used book sale–$1.00 for hardbacks, 50 cents for paperbacks. We couldn’t pass that up. A shop for really fabulous and colorful fashion and home decor was J. Wilde, also downtown. They had lots of knit and crochet fashions, plus lots of garments that combined knitting and crochet. Hey! TextileFusion at work!
My three-year-old ran out of energy about 4:00 in the afternoon, so we went back to the hotel, but not before I got a shot of this cute San Angelo mosaic is by an unknown artist.

Polymer Buttons Find New Home!
Nana Sadie Rose sews and sells tote bags for knitters, crocheters, and teachers, using fabric that her customers choose on-line. The bags are roomy, full of pockets, well-proportioned, pretty, and beautifully-made. Lucky knitters who own Nana Sadie Rose bags just love them.
You can probably imagine how thrilled I felt when Nana Sadie Rose asked me to make polymer clay buttons for some of her bags. She will soon have bags available in this retro-kitty fabric with great colors. I mixed clay to match the turquoise in the print and then added other colors to make stacked buttons.

These swirl buttons match the brown and pink kitty footprint and polka-dot fabrics. The buttons look delicious, like chocolate and raspberry crème.

As you know, a knitter can always use another tote bag. A Nana Sadie Rose bag is the perfect gift for the knitter who has everything. Order before mid-November, if you would like your new bag delivered before Christmas.
One Down, About 600 to Go
I’m freeeeeeeeeeeeee! For those of us who filed an extension on our 2005 tax returns, today is the last day to get them in the mail. And we did it with over an hour to spare, even though our little post office closes at 3:45! Hurray! There’s even better news. I am caught up with my bookkeeping for the first time since Ella was born 3 years and 9-ish months ago. Hurray again!
Tonight I will celebrate by making buttons, which is one of the several hundred things I would rather do than complete tax returns.
My poncho is almost finished, due to many hours on the road to the Taos Wool Festival and evenings in the hotel. My pink and black yarn collections are visibly smaller. The poncho still needs trim. I’m considering an alternative to fringe, but don’t know what it will be yet.
Quilty Success
My computer was ready to pick up on Friday, a day later than promised. “It took a lot longer to download the updates than I thought,” said the computer repair guy. If he needed a day longer to get it back up to speed, it would have taken me a week longer, so I still came out ahead. But, oh, I missed my little computer!
He managed to install Windows Service Pack 2, a feat which I had not been able to accomplish, even after reading lots of Windows help files. When they recommended changing something in the register, the mysterious file that contains the DNA of the computer’s brain, I decided to turn it all over to a pro.

Enough about computers! We got home from Taos on Monday night, completely exhausted. We had a wonderful week. On Tuesday, Joy of my favorite Joy’s Fabrics (Stephenville, TX), left a phone message, saying “I have your quilt and your ribbons. Come by when you have a chance.” She emphasized the ‘s’ in ribbons.
The Town and Country Quilt Guild in Stephenville puts on a quilt show every year. It is called “Threads of Texas.” Joy was kind enough to deliver my snowflake quilt and pick it up, since we were away in New Mexico. The quilt won second place in “Mixed Media, Medium Size” and it won a Merit Award. I need to find out what that one is about.
More about Taos next time, also poncho news and eventually a few notes about entering your work in contests.
Taos is Tiring!
What an exhausting week! But it’s that good kind of exhausting, where I’ve done exactly what I love to do all day long.
Tuesday, we did the “Freeform Knit/Crochet an Underwater Scene” class. Stephanie combined elements from several pictures for the background, and crocheted a fish to live in the scene. It is a work in progress, she says. She plans to add some yellow seaweed to show the fish up a little better.

I made progress on my own crocheted underwater scene, adding a few pieces to the foreground. Charlene, another class participant, showed me how to achieve mitered corners for my binding. Hurray! It’s a very sensible technique, now that someone has explained it to me.

We knitted “Cables, Bobbles, and Braids” on Wednesday. So impressive and so easy to learn! We worked so hard, I forgot to take photos.
Thursday, we made buttons, buttons, buttons. The polymer clay buttons were favorites, of course, and everyone made a bunch. As usual, I was inspired by the color combinations that people came up with. Now I want to go home and play with clay for a few days. We also made felt buttons and needle-worked buttons. They aren’t quite as exciting as polymer, but we got some very nice-looking specimens by the end of the day.
Charles and the girls visited Sand Dunes National Monument yesterday. Charles said, “We’re going to go play in a huge sandbox with no cats around to mess it up!” They were three very sandy persons at the end of the day.
An Old-Time TextileFusion Tablecloth
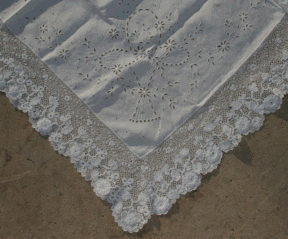
People have done TextileFusion for a long time! Here’s a fabulous tablecloth that combines an Irish Crochet trim and eyelet embroidery. I don’t know its history, except that it is the last piece I bought before we moved away from Sheffield, England. It is in perfect shape.
In other news, the heart wall hanging is getting closer and closer to finished each day. Some days I get a lot of buttons sewn on, other days only one or two.
More Irish Crochet

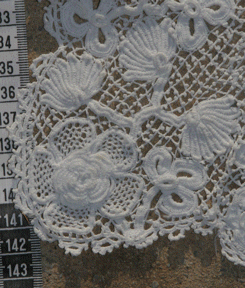
This little collar is a great example of crocheting over a core thread or padding, which was a common technique in Irish Crochet. What you do, is wind thread around your finger or something similar. Then you make as many single-crochets as possible over the resulting thread ring.
The rings in this collar are plump, which means the crocheter made many rounds with the padding thread before starting to crochet. They are satiny, which means there are lots and lots of single crochets. The criss-cross threads in the center of some rings are done with a needle and thread. I can’t tell whether they stabilize the ring or whether they are simply another detail in the design.

The skinny threads and the plump rings and the medium-weight of the crochet make this piece very intriguing to the eye. The collar is damaged around the inside edge, but I mainly wanted it to illustrate padded crochet. Collecting is so much easier if you aren’t a perfectionist.
Taos and Stone Pillar
The Taos Wool Festival is almost upon us! I’ve been packing for days. When I drive to teach instead of fly, I can think of lots more stuff to bring. Some might say I bring way, way too much. Hope there’s room in the van for clothes!

Last week we had a stunning orange sunrise and a rainbow that went unbroken from horizon to horizon! Our pillar (read about it here), was lit by that orange light and, with the rainbow in the background, we couldn’t resist a photo. This is a view to the southwest.
More Heart Buttons
After reading the post before this, one of my regular readers (Hi Mom!) said, “When you put all those buttons on the background, they obliterate the patterns.” Hmmm. The patterns look pretty good. Do I really want to obliterate them? Nooooo so it was time for another button session.
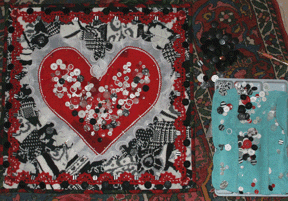
Here’s the wall hanging with buttons randomly sprinkled over the heart. I’m fond of this look, but it really looks better in person. The flash makes it look too stark. There are already 60 or so buttons sewn around the edge. Can you see them?
And my button tray is there on the right, with a washcloth to muffle the clatter of buttons. I didn’t want to wake my girls up with the noise. They would probably want to get up and play buttons, too.

I like this alternative, too. It’s a little rough in this picture, but how about these stylized button flowers? They probably need rearranging.
Well, there’s still time to think about it. I’m sewing frosty buttons on the pleated trim around the heart, and I worked out a way to hide the ends of the trim.
Comments and suggestions are welcome!
A Personal Crochet Revival

Having done a lot more crochet lately, I trawled around to find out what crochet groups Yahoo had to offer. Wow. I found some just right for me. One was the Irish Crochet Lovers group. I fell in love with Irish Crochet in the early 1980s, when I found some reprints of old Irish Crochet instruction books.
While we lived in England, I bought three pieces of Irish Crochet. This one must have had sleeves originally, but someone cut them off. Yes. Cut them off. That is why I could afford this otherwise fine piece of crochet.

Here it is, a little closer. Look at the variety of motifs! They would have been crocheted separately, then attached to a foundation. The background crochet was worked between the motifs. The completed piece was removed from the foundation.
The measuring tape in the picture below shows inches on the right and centimeters on the left, which gives you an idea of how tiny the stitches are. The motif is at the front bottom corner of the jacket fronts. To think that many Irish Crochet pieces were worked by children! I read that crocheters embedded wire into a cork to use as a crochet hook. We are so lucky nowadays.


