
Mud on the Walls

“All right, guys,” said my cousin Jerry, “it’s time for a pie run.”
“Yay!” said Eva, clapping her hands. “I love pie!”
Poor girl. She soon found out that Jerry wanted them to pick up the cow patties from our dirt pile, so we wouldn’t have smelly bricks. This was our dirt pile at the beginning of August. It’s much smaller now.
We don’t want cow manure in our bricks, but plaster is another matter. People have been using animal hair and manure to add fiber to plaster for many centuries.
Ew. Sounds yucky. We may try it.
After our first plaster layer on the well house failed, we conducted a plaster experiment. We mixed up different proportions of sand and dirt. Some of the mixtures included chopped hay.
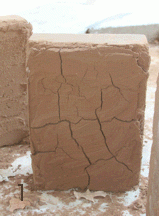
Photo 1 was our dirt-only mixture, just like we used on the well-house. No surprises there. It cracked and curled away from the brick like the mud plaster on the well-house did.
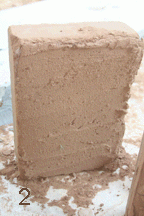
Photo 2 is the mortar mix we use to glue the bricks together (3 parts dirt to one part sand). It looks alright.
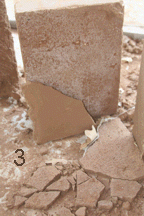
Our favorite was Photo 3, two parts sand, one part dirt. It was so smooth and pretty. About the fourth day after we plastered the test bricks, we came to work to find all but one sad little corner of the plaster layer fallen to the floor, having come away from the brick as clean as you please.
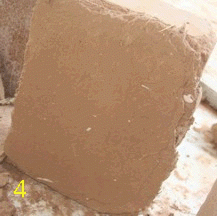
Two parts sand, one part dirt, and one part hay looked good and stuck to the brick, as you see in Photo 4. We went with that for plastering the inside of the well house. We may use it inside the house, too. It won’t hold up to rain. We hope there won’t be any rain falling inside the well house.
Another Week of Progress on the Earthen House

Warning! If you build a house with dirt, you’re bound to get dirty!
This is Eva after a morning of shifting newly-pressed blocks off of the block machine. All of us brick-movers were covered with fine grit. Two good things about being so dirty: your teeth and eyes look very bright, and showering makes you feel especially great.

After we set up and poured a reinforced concrete bond beam around the top of our well house, Jerry, Bobby, and Alex spent an afternoon in the hot, hot sun making its roof. We were all very proud of our accomplishment.
But did you notice that the mud plaster is artfully flaking off of the building? We learned from experience that our particular dirt plus water alone do not make good plaster. Eva, my sister-in-law Kathy, and I chipped the rest of the mud plaster away to prepare for a layer of lime plaster. I liked the crunch of mud plaster under my feet. We’ll recycle the dirt.

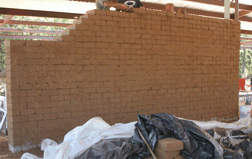
We worked on the inner earthen wall of the house until it was 9 feet and 4 inches tall (2.85 meters). It will join to the outer wall with an arch. But since the outer wall isn’t ready yet, we built as much of the inner wall as we could, which is why the bricks step back.

We’re going to start building the outer walls next, so Eva, Kathy, and I prepped the stem walls with primer and rubbery roof mastic. It forms a vapor barrier between the foundation and the earthen blocks. Here’s Firewheel making sure I don’t miss any spots.

What has Ella been doing all this time? She spends a lot of time at Oma and Granddad’s house. And she has started baking. She reads the recipe, preheats the oven, measures, and mixes all on her own. I’m allowed to get ingredients from high shelves and place items in the oven.
“Mom, did you ever make muffins and stuff?” she asked.
“I started baking stuff when I was about….” I had to think a minute. “About nine or ten years old,” I finished.
Ella smiled big. “Yes!!” she said. She’s only seven.

Well, Well, Well Houses

To practice our earthen brick-laying and plastering technique, we built a well-house. Our rock foundation, about 5 x 7 feet on the inside, rests on top of a concrete foundation that we dug by hand.

The first layer of earthen block is always the hardest to lay, because you have to line up and level each block. It’s not so easy to do when your foundation was made by amateur stone masons. That would be me, my nephew Bobby, my daughter Eva, and her friend, Alex.

We prevailed in the end, and built the walls up to the point where we wanted an arch-shaped opening. The arch form is two plywood semicircles. Charles led the arch construction. The crew was reluctant to put their faces in the photo, so their t-shirts immortalized here in the picture of the finished arch.

Shaping and then laying blocks around the arch was a challenge. But again we prevailed. We put up the first of several plaster layers. Next week my cousin Jerry will pour a bond-beam (reinforced concrete) on top of the walls, and then he’ll build the well-house a roof.
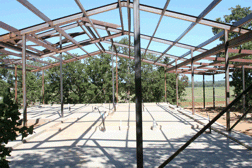
As all this was going on, welding guys were putting up our house roof. The frame made it feel so much more like a house. A short week later, the roof was finished. It was Jerry’s idea to build the roof first, so we could work in the shade and so our earthen walls would be protected from rain.
We moved in as soon as it was done—you know, our water jug, our lawn-chairs, and the hundreds of bricks we made earlier in the week. Re-stacking the many 40-pound bricks wore us out in a hurry.
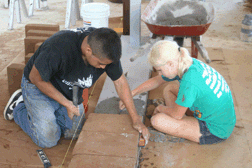
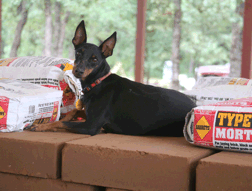
Our big moment came last Friday afternoon, when we laid the first earthen block on the house. Minutes later, the new roof came in handy during a downpour that lasted, oh, about four minutes. My Dad and our dog, Firewheel, enjoyed dry seating as the rain dripped from the roof .

Judi & Co. ‘Cordé’ on a Handbag

Judi & Co.’s lustrous Cordé (100% rayon wrapped around a cotton core) gives stunning texture and definition to crochet stitches. It comes in many color-ways, but this one in particular makes me think of raspberry chocolate cream. Apparently the folks at Judi & Co. were thinking along the same lines, because it is called “Cherry Bon Bon.”
I used a little over one hank of Cordé to embellish this handbag. I made flower fabric (read more about how to make it here), using flowers and leaves from Crochet Bouquet:
- Oval Center Rose (page 28)
- Compound Leaf (page 107) with Round Leaflet (specific instructions on page 108)
- Corrugated Leaf with three points on each side (page 109)
- With Simple Fives (page 33) and smaller Corrugated Leaves to fill in the spaces.

Basically, I made a template the same size as the handbag, arranged the motifs to fit the space, sewed them together with sewing thread, and then hand-sewed them onto the handbag. I sewed all around the edges of the flower fabric piece, and then tacked it at strategic points to keep it from sagging.
Judi & Co. carries over 30 different ribbon styles in dozens of color-ways. Most of the ribbons are great for crochet. I also like to crochet their solid and multicolor raffia-like yarn.
Clones Knots with Máire

Irish crochet lace has been an inspiration to me since the 1980s, and so you might imagine how pleased I was to take an Irish crochet workshop from Máire Treanor at the Knit and Crochet Show earlier this month.
Máire is from Ireland, and she’s the author of Clones Lace: The Story and Patterns of an Irish Crochet.
Máire showed us some stunningly beautiful examples of crocheted lace from Clones. She said that the crocheters of old specialized in certain motifs. Someone else would buy a bunch of motifs and then crochet them together. She also showed crocheted laces from other countries, which were most likely inspired by Irish crochet lace.
See all the Clones knots in my class sample? They’re so cute! My favorite tip we learned was how to make the Clones knot by swiveling our crochet hooks back and forth.
My doily is about 12 inches (30 cm) across. Máire’s little crocheted doilies use even more motifs than mine, but hers measure no more than 5-1/2 inches (12 cm) across. She uses much finer thread.

When I’m finished joining all the motifs, I’ll take out the green tacking thread and remove the paper.
Several people asked me what yarn I was using, because they loved the pale pink and pretty butter cream colors. Aunt Lydia’s No. 10 crochet cotton. Really. The green shamrocks are DMC Cebelia No. 10.

Instructions for the motifs and the Clones knot appear in Máire’s book, which has been reissued recently by Lacis. The cover is slightly different than the one shown above. The catalog number is LH52, price US$28.00.
- Say Máire’s name more-or-less like this: MY-ra TRENN-r
- Clones is pronounced CLOH-ness. It’s the name of a town in Ireland.
Crochet in Manchester

My first impressions of Manchester, New Hampshire, earlier this month were: the wonderful smell of pine mulch, red brick buildings, street names that reminded me of American History class, and pretty little red peppers growing into the fences along the sidewalk. Oh, and an unusually large number of ladies wearing crocheted clothing.
The Knit and Crochet Show was in town! It started on Wednesday morning with the Crochet Guild of America Professional Development Day. I enjoyed listening to Kristen Ohmdahl and Lily Chin speak about their lives and careers as authors and teachers.

The same afternoon, I went to work, conducting three consecutive round-table discussions of “A Book’s Journey, from Idea to Book-Signings.” Our table was full and overflowing for all three sessions, so I’m expecting to see a bunch of new authors publishing their crochet books in the next couple of years.
When they could get a word in edgewise, people asked great questions. I was pleased to note a healthy interest in publicity. Nowadays it’s very, very important that authors be involved in the publicity for their own books.
But it wasn’t all work for me. The next day I took a class for the first time in ages. Yay! Here’s my class sample. I wrote more about the workshop and my teacher, Máire Treanor, at Clones Knots with Máire.

The convention hotel was in downtown Manchester, so we could walk to all kinds of shops and restaurants. My favorite was Lala’s Hungarian pastry shop and cafe. Their most unusual item was sour cherry soup, which was cherries in a sweet-tart yogurty sauce, served cold. The stuffed kohlrabi leaves in dill sauce were mouth-wateringly good. I’ll go back just for the pastry and coffee.
I hope the Knit and Crochet Show will be in Manchester again someday.
During, Before, and After the Rain

We had a good rain yesterday afternoon. A power line broke during the storm, which left us without power for about three hours.
Eva was crocheting a gift for a friend who is moving away. She did not let a little power outage stop her work. Here she is, crocheting by flashlight.
Luckily, our slab was poured the day before! The weather has been so hot, the contractor spread hay all over the fresh concrete, and we have to water it a couple of times a day. The rain watered it yesterday!

Those heavy stem walls you see in the picture are going to support compressed earthen blocks which we will make with a totally fabulous machine manufactured by AECT of San Antonio, Texas.

We had to have a concrete pump for this last concrete pour. That pump was a thing of beauty. Mr. Hammer, the owner and operator, used a remote control device to move the pump around. When he raised it up over the trees and moved it over our slab, it looked like a slow and graceful mechanical ballet dance. Gorgeous! In this picture, the concrete truck is dumping concrete into the pump.

This prickly pear cactus, which grows on our new place, is the native home of the cochineal beetle. The rain made the bugs’ webby homes a little soggy. Usually they are pure white, but the wetness has made the beautiful bluish red show through. You can probably see the color better in the close up, below.
Cochineal revolutionized the dyeing industry in Europe a few hundred years ago. The tiny beetles made the best red dye ever, until chemical dyes came along.

Ladybug and Heating Pipes

Knitters, always remember that duplicate stitch is an alternative for adding small areas of color to your projects! Also, you can use duplicate stitch to customize store-bought sweaters.
Essentially, you thread a needle with your yarn and embroider over the knit stitches that are already there, duplicating their shape as you go.
I designed and embroidered this ladybug on a purchased cardigan many years ago. Both my girls have outgrown it now. Before putting it away, I wanted to show it off. I used embroidery floss to do the duplicate stitch. It thickens the fabric a little, so I prefer to use it fairly sparingly.
This pattern was published under the title “Ladybug, Fly Away Home!” in Wearable Crafts (Vol. 3, No. 4, p. 31, August 1993).

Here’s looping of a different kind. These are pipes for our under-floor heating system. The pipes run into and out of a manifold that is attached to a pump and eventually to its own water heater. So we’ll have warm feet in winter. Yay!
First my Dad, Eva, and I laid in the insulation boards and duct-taped them all. Then my brother Van and I installed the pipes. He studied the instructions very carefully so our installation went smoothly. The people at Radiantec (where we bought the system) are very helpful and patient with their do-it-yourself customers.
In a few days all this will be covered by concrete, and we’ll be ready for the roof.
Palm Leaf CAL and Tutorial

School is nearly over for the two daughters in my house, and they’ve already asked if we can spend some time at the beach this summer. This reminded me of palm trees, and that reminded me of the crocheted Palm Leaf on pages 112-113 of Crochet Bouquet.
Please join me in crocheting the Palm Leaf for our June 2010 Crochet Along. To help you figure it out, here is a tutorial.

Row 1 is easy enough, and you can see Row 1 completed in Photo 1.
Originally, I wrote this pattern with three rows, but my technical editor, kjhay, felt it would be easier to understand if we combined my rows 2 and 3 into a single instruction, which is Row 2 in Crochet Bouquet.
Row 2 of the Palm Leaf pattern begins at the center of the leaf, goes out to the tip of a spike, and back to the center.

Photo 2 shows the Palm Leaf after “ch 11…” on the very last line of page 112. The ch 11 is a long, long turning chain.
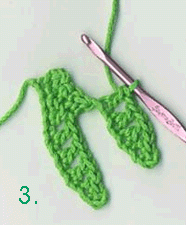
Now turn and work back along the chain. Photo 3 shows what the piece should look like after the “3 times;” on the second line of page 113.
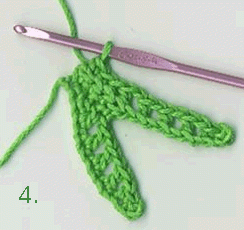
The next few stitches are actually worked into the first few stitches of Row 2, bringing us back to the center of the leaf (Photo 4).
The instructions tell you to make the stitches into the back loop only. Most of the time, we catch the top two loops of any crochet stitch as we work. The front loop is the one that is closest to you as you work. The back loop is the one that is away from you as you work.
Working into the back loop each row, as we’re doing in the Palm Leaf gives a corrugated look, and it helps us gather the leaf when we’re finished crocheting the points of the palm.
Repeat Row 2 seven more times, and end with a piece that looks like the one in Photo 5.


To gather the leaf, pull up a loop in the base of each spike, except the one you just finished. It doesn’t matter where you put your hook, as long as there’s one loop for each spike. (Photo 6)

Yarn over hook and draw through all the loops on the hook. Pull the loop tight to close the gathered edge as much as possible. (Photo 7). Ch 1 to anchor the gather. Then make the stem.
Now that you can make the Palm Leaf, check out Topsy Turvy #1 (pages 40-41 of Crochet Bouquet). It works exactly the same way.
Powerful Pearls
Like most blog writers, I’m eager to know when others link to my site. Recently I found a link coming from a foreign language site. I peered closer at the link. It was Turkish, and, and, AND…I could read it!

How does a gal from Texas decide to study Turkish? And what in the world does this have to do with Crochet Bouquet?
Well, I’ll tell you.
We must go back twenty five years or so, to the Austin Public Library, where I found this book: Tulips, Arabesques, and Turbans: Decorative Arts from the Ottoman Empire (by various authors, Abbeville Press, New York, 1982). This book introduced me to the wonderful ceramics, metal work, textiles, and calligraphy of Turkey.
A motif you’ll see frequently in Turkish tiles and textiles is chintamani, or the three dots. They’re often used together with wavy lines. The three dots probably represented three legendary pearls floating on the waves of the sea. The pearls symbolized good luck and power.

The three dots motif was the inspiration for the Pearl Trillium, on pages 87-88 of Crochet Bouquet. The sea waves became the wavy leaves behind the flower. You probably noticed that the colors I chose for the flower are from the cover of the book.
As I pored over the gorgeous images in Tulips, Arabesques, and Turbans, I vowed I would go to Turkey someday and see those wonders for myself. That’s why I’m learning Turkish.
Many thanks to farfin for linking to Curious and Crafty Readers.* To return the favor, here’s her site, 10marifet.org, which has lots of cute craft ideas and great examples of needlework. You don’t have to read Turkish to enjoy. Çok güzel! Teşekkür ederım, farfın!
* Curious and Crafty Readers was originally meant for blogging about my books, but now all those posts have been folded into textilefusion.com/blog.


