
I Finally Discovered Jelly Yarn!

Knitters and crocheters were talking about Jelly Yarn years ago. I finally tried it and wow! It’s fun!
I used superfine Jelly Yarn and a size E (US) hook to make this Ray Flower from Crochet Bouquet.
The prescribed way to block Jelly Yarn projects is to duct-tape them to a flat surface and place a heavy book on top for several hours.
For a small project like a flower, grip opposite petals and stretch for a count of 30, then moving to the next set of opposite petals, and the next, until all are stretched. Fold the top of each petal back, and then let it move back to the front on its own. Repeat if necessary.

The vinyl Jelly Yarn starts to stick to your hook after a while, making it difficult to crochet. Wipe your hook with a dab of lotion or Burt’s Bees Balm to make crocheting easier. It smells nice, too.
So what do you do with Jelly Yarn flowers? I’m thinking key fobs or ornaments. Any other ideas?
A Great Afternoon at Front Street Books

Charles drove me the three blocks from our hotel in Alpine to Front Street Books, where “A Crochet and Knitting Afternoon with Suzann Thompson” would start at 2 o’clock.
Why did we drive, when the weather was so nice? Because I had too much stuff to carry, as usual.

We spread flowers and flower projects on every surface, except for the few square feet that held snacks. I lingered over the flowers near this area, so I could breathe in the chocolaty goodness. Yum.
The talking started as soon as the first yarn lovers walked through the door, which won’t come as a surprise. We talked about yarn and where to buy it, the steps of writing craft books, and much more.
I showed my precious spiral-bound copy of Crochet Bouquet. Julie, the manager of Front Street Books, confirmed that book store owners do not like spiral-bound books. “They’re difficult to display,” she said.
“Besides, you can’t read the spines,” said Kay, who also showed a clever hand-held loom called a Weav-ette.

As we discussed yarns and technique, Susan sat crocheting a daffodil with a “How to Crochet” book peeking from underneath her copy of Crochet Bouquet. We were amazed at how quickly she learned to crochet. “Well, I knit,” she said modestly, to explain her quick mastery.

Many knitters I know use “I knit” as an explanation for why they can’t learn to crochet. Go figure!
After a while, our discussion broke into smaller groups and we helped ourselves to treats and coffee. Susan, twelve-year-old Kara, Alison and I had a crochet lesson. Julie’s aunt, also named Julie, almost finished a rib-and-shell hat she started that same afternoon.
It was a happy day.
Come to a Crochet Bouquet Event in Alpine, Texas

Please come and visit with me at an informal Crochet and Knitting Afternoon at Front Street Books in Alpine, Texas.
You’ll see lots of flowers and projects from Crochet Bouquet, and some samples that will be new to you. I will demonstrate techniques from the book and show you a really clever way to create plastic bag yarn.
Bring along your own project to work on while we talk and enjoy coffee and sweets served by Front Street Books.
If you have crochet or knitting questions, I’ll do my best to help you.
Time:
2-5 p.m., Saturday, November 13, 2010
Place:
Front Street Books Reading Room
201 E. Holland Avenue
Alpine, Texas 79830
432/837-3360
Fax: 432/837-1126

See you there!
Ray Flower, Step by Step

Four years ago this month, we visited beautiful Alpine, Texas. My husband drove and I sat in the passenger seat, designing the Ray Flower (pages 31-32 of Crochet Bouquet). Next week, I’ll be going to Alpine again. This time, it’s for a crochet and knitting afternoon and book-signing at the incomparable Front Street Books (fsbooks.com).
It seems right to feature the Ray Flower in this month’s crochet along.

In the Ray Flower, you always work with only one yarn at a time, even though one row looks like it may have two yarns going at once. These step-by-step photos show you how it’s done. They are meant to supplement the crochet instructions in the book.

Colors alternate for four rounds of single crochet, in the center of the flower. Instead of cutting the color after each round, end it off but do not cut. Photo 1 shows Round 2, all finished and joined with a sl st. I opened the last loop enough to slip the skein of yarn through it. Now it’s ready for the next round. Photo 2 shows how it looks from the back.

Photo 3 is the Ray Flower, with Round 5 completed.

For Round 6 (Photo 4), you fold Round 5 out of the way, so you can stitch in the skipped stitches of Round 4.

Then you bring Round 5 back up and sc in the tops of its dc-sts, as in Photo 5.
Photo 6 shows Round 7 finished, except for the needle join. I love the needle-join, because you can’t see where the round begins or ends—very slick!

As you can see, I cut the yarn and pulled the last loop straight out of the top of the sc. The instructions say to “needle-join to first st of rnd.” The first st of the round is a ch-st, indicated by the orange arrow. The yellow arrow shows where to insert the tapestry needle, after you have threaded the yarn end in it.

With a needle-join, you are following the path of the top loop of the stitch you are joining to. So you insert the tapestry needle from the front, following the loop to the back, and then you insert the needle into the top of the stitch you just finished crocheting. (Photo 7)

For sc, dc, and treble, you should catch two threads in the back, before you weave in the end in the direction of the yellow arrow in Photo 8. For a ch st, there’s only one loop to catch before you weave in; for a hdc you needl to catch three threads. Look closely at Photo 8 to see the two threads the needle join catches.
For this sample of the Ray Flower, I used Lion Brand Yarns, LB Collection Cotton Bamboo. It’s soft with an attractive sheen.
Moving In to the Earthen House

We were still putting away tools and straightening the building site after our Labor Day work session, when someone moved in to our new house. She made herself right at home, making a home in our new home!
It’s fun to watch these bluish black wasps dig in the ground. The dirt just flies out behind them. They work diligently and they can move a lot of dirt in a hurry. We can’t tell if they’re looking for food or making homes for their little ones. I think ours was making a nest. She bored herself a nice little cave in a spot where the mud was still soft.
Hmm. I wonder if our little wasp is eligible for a new homeowner tax rebate? She did move in before September 30. But wasps can’t write, so she probably didn’t have a contract in place before May 1st. She may not even have been born before May 1st. Oh well. What use would a wasp have for $8,000 anyway?
September Wall Building

September and our northwest wall started about the same time. See the tab that sticks away from the wall, behind the small pallet of bricks? It is one side of a divider-wall that will join its larger counterpart over an arch later on.
My brothers Eric and Van and Van’s wife Kathy were in town over the Labor Day weekend, so we had a family work session.
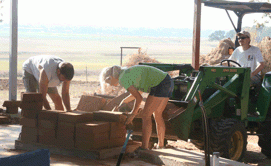
Van drove the tractor as Eric and Eva loaded broken blocks and leftovers from cut blocks. Van hauled them to our big dirt pile, where they eventually break down. Driving over them with the tractor helps. So does rain.
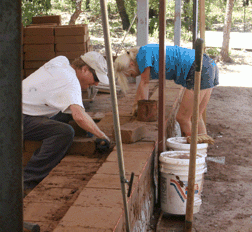
Once the broken bricks were gone, we worked on walls. Here, Van and Eva have finished laying the outside part of the wall. It takes the longest, because we have to line all the bricks up to a mason’s string in order to keep the wall straight. (Or in our case, straight-er.)

Van also mixed slurry for us. This mix of dirt, sand, and water is the consistency of thin pudding. It makes the most fabulous noises when you pour it into a bucket. Gloop–gloop!

Here, Kathy and Eva discuss how best to place bricks. We try to avoid having too many seams in the same place, even though the bricks are interlocked down the middle of the wall.

Later, as the dirt from cut and crumbling bricks and slurry drips piled up, Kathy valiantly swept the work area. Keeping an earthen block building site clean is very, very difficult.
Eric and Eva had great fun squishing mud slurry between bricks. You’re supposed to lay the brick in the slurry, then shove it against the previous brick so that the slurry fills the space between them. It often splatters up, much to Eric’s chagrin, when he got an eyeful of slurry.

Most of the time, the slurry just splatters everywhere else, especially onto Eva! Little did she know that she was inspiring her young cousin, Alanna.
After seeing a photo of muddy Eva, Alanna asked, “Will I be able to help build the house when we visit?” The lure of mud is very strong.

Meanwhile, across the way, Charles and Alex put another layer of lime plaster on the well-house. They also plastered the inside with dirt, sand, and mud. It is a most beautiful, hand-made building, and we are very proud of it.
Denim Jacket with Crocheted Flowers and Leaves

Here’s a project that uses the free Frilly Target Flower pattern from the last post plus the Scallop-Edge Leaf from Crochet Bouquet.
To make the flowers and leaves, I used Louet’s Euroflax Sport, a 100% linen yarn. Linen has a beautiful texture for knitting and crochet. You can use any yarn you want to decorate a jacket, though a smooth yarn will show the details of the crochet better.
You Will Need
- 3 colors of fine weight (2) yarn. Coordinate leaf and petal colors as in photo or as desired.
- Hook: 3.5mm/E-4, or size to give a firm gauge
- Purchased jeans jacket
- Sewing needle and matching thread
- Pins
Instructions
- Crochet the large and medium versions of the Frilly Target Flowers (see the blog post just before this one), changing colors after each picot round as shown in photograph.
- Crochet two Scallop-Edge Leaves (pages 116-117 of Crochet Bouquet), needle-join Rnd 2, and then change color for the scallop round. Make a stem about eight chain stitches long.
- Make one long and one short stem for the flowers as follows: chain desired length, then sl st in each ch. Weave in all ends.
- Arrange the flowers, leaves, and stems on the jacket, using photograph as a guide. Pin and sew them in place.
The project shown here was created with Louet’s Euroflax Sport, 100% Wet Spun Linen, 3.5oz/100g = 270yd/247m per skein.
Free Crochet Pattern for Frilly Target Flower

I designed the Frilly Target Flower and its variations for Crochet Bouquet. The flower didn’t make it into the book, but it’s too pretty to keep to myself. So here are the instructions.
Medium and large versions have picot frills, which you may choose either to crochet or to leave off completely. Consult your copy of Crochet Bouquet to see pictures of the needle-join; written instructions for the needle join are at the end of this post.
Frilly Target Flower
Finished Measurements
Large Frilly Target worked in medium weight (4) yarn using G or H hook for a firm gauge: 6 1/2″/16.5cm diameter

You Will Need
1 or more colors of yarn of similar weight; you can use yarn scraps or yarn from your stash
Hook: Appropriate size hook to achieve a firm gauge with selected yarn
Gauge
Work with a firm gauge to help the flower hold its shape. You may need to experiment a little.
Pattern Notes
- The instructions are written to change colors after each round of picots. Even if you do not want to change colors, cut the yarn and needle-join the picot round for the best looking flowers.
- For large Frilly Target, work all rounds of instructions.
- For medium Frilly Target, work Rnds 1 through 4, then Rnds 7 and 8.
- For a smooth center, omit picot Rnds 2 and 4.
- If you prefer not to change colors, you may join with a slip stitch at the end of a round, then ch 3 to take the place of the first dc.
- Picot-only variation: Work Rnds 1 through 6 only.
- Picot (picot) = ch 3, sc into 3rd ch from hook.
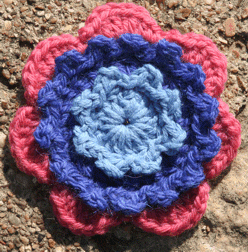
Ch 6; join with sl st in first ch to form a ring.
Rnd 1: Ch 3 (counts as first dc), work 15 dc in ring; join with sl st in top of beginning ch-3 (16 dc).
Rnd 2 (optional): Working in front loops only, *picot, skip next st, sl st in next st; repeat from * 7 more times; needle-join to first st (8 picots).
Rnd 3: Working in back loops only of Rnd 1, join next color with dc in first st, (2 dc in next 3 sts, dc in next st) 3 times, 2 dc in next 3 sts; join with sl st in first dc (28 sts).
Rnd 4 (optional): Working in front loops only, *picot, skip next st, sl st in next st; repeat from * around more times; needle-join to first st (14 picots).
Rnd 5: Working in back loops only of Rnd 3, join next color with dc in first st, 2 dc in next st, (dc in next st, 2 dc in next st) 5 times, 2 dc in next 2 sts, (dc in next st, 2 dc in next st) 6 times, 2 dc in next 2 sts; join with sl st in first dc (44 sts).
Rnd 6 (optional): Working in front loops only, *picot, skip next st, sl st in next st; repeat from * around more times; needle-join to first st (22 picots).
Rnd 7: Working in back loops only of Rnd 5, join next color with sc in first st, ch 5, skip next 3 sts, *sc in next st, ch 5, skip next 3 sts; repeat from * around; join with sl st in first sc (11 ch-5 space).
Note: The single crochet stitches of Rnd 7 serve as anchor stitches for Rnd 8.
Rnd 8: Ch 1, (sc, hdc, 4 dc, hdc, sc) in next ch-5 space, ch 1, sl st around next sc (anchor st), *ch 1, (sc, hdc, 4 dc, hdc, sc) in next ch-5 space, ch 1, sl st around next sc (anchor st); repeat from * around. Fasten off.
Finishing
Weave in all yarn ends.
To needle-join:
When you are finished with the last stitch of a round, do not remove needle from the last loop. Cut the yarn, leaving a 4″ end. Pull the hook straight up from the last stitch, so the end of the last loop comes free of the stitch. Thread the yarn end into a tapestry needle.
When you look at the tops of the stitches of the round, they look like a series of “v”s growing out of each other. Find the “v” at the top of the first stitch of the round. With your needle and thread, you will follow the course of this “v” under the threads of the next “v” and back to the top and down into the last stitch.
Here goes:
Following the “v” at the top of the first stitch, Insert the needle from front to back under the top of the second stitch of the round. Pull gently to tighten.
Following the “v” thread of the first stitch, insert the needle into the top of the first stitch. Continuing with your needle, find the loops where your yarn end emerges from the last stitch. Insert the needle back into those loops. Pull gently to tighten. Weave in the thread end at the back of the work.
Earthen Walls Rising in August

Ella built this entire earthen block castle in one morning. Not only that, she made a mud queen, mud guards, and a mud chicken to run around the castle grounds.
Our house is progressing slightly slower.

At the beginning of August, we started the second of our two inside earthen walls. Here it is, with two layers of brick.

By the end of the month, the inner wall, plus the south and west walls it attaches to, were about five and a half feet tall. I can walk under our mason’s string without having to duck, which is a good thing for the string and me. We can see actual rooms now. Hurray!

The walls are complete with electrical outlet boxes and a switch box. So far, we’ve only marked the spaces where the windows will be. Before we can go any further on the window walls, we have to make up our minds which brand of windows we want. Then we’ll make wooden frames for the rough openings and lay brick right up to the edges of the frames.

Our roof sits on steel beams which are embedded in the walls. To give the beams room to move, which they will in a stiff wind, we devised this chamfered corner treatment. There’s quite a bit of creative brick-chopping involved. You know, triangular pieces and such.
Every now and then someone asks, “How many bricks are you going to need to build this house?”
I don’t know. I’m trying to avoid knowing. I’m afraid that knowing the enormous number of bricks we need will discourage me. For now, it’s better to make bricks, build walls until we run out, and then make bricks again.
We’ve made enough bricks now to have perfected our block-making routine. The AECT block-making machine sits next to the house. Its conveyors go onto the front porch. We have about a dozen pallets arranged on the slab.

Jerry loads the hopper with dirt, using my dad’s little tractor. The machine makes about 300 blocks per hour, which keeps Jerry and the tractor pretty busy.
The machine keeps three brick stackers busy, too. We measure each block as it comes out, then carry that 40-pound rascal to a pallet with other blocks of its size. Given the choice to sort now or sort later, we found that sorting now saves a lot of time and muscle. Here, Alex and Eva are ferrying bricks to their proper pallets.
After a morning of block-making, we can truthfully say, “We made a ton of bricks!”

Circumnavigating to Dallas in January

Last time I went to the Dallas Hand Knitters Guild, several knitters showed off their finished Circumnavigated Cardigans. Medrith Glover wrote the pattern for any gauge and any size. She guides the knitter through calculations and interesting construction techniques. When you’re done with the Circumnavigated Cardigan, all you have to do is weave in your yarns ends! No sewing required! All the bindings and ribbings and other details are taken care of as you knit.
I had to try it for myself. It took me a little longer to work out some of the details, because instead of making it with just one yarn, I decided to use the Seveness color technique. It looks very rich, with many shades of brown and orange highlights.

Finally I got to the point of joining the saddle shoulders, and was eager to pick up stitches for the sleeves, when I had to move on to some other, more urgent project.
But now the Seveness Circumnavigated Cardigan is on the schedule again. It must be finished for show-and-tell at the January 4, 2011 meeting of DHKG.
Why? Because I’ll be speaking at that meeting, and even the speaker is encouraged to show and tell.
My talk will be “Designing for Knitting: 2% Inspiration, 98% Hard Work,” in keeping with their theme for 2010, which focuses on knitting design, from vision to needles to fabulous garment. Check the DHKG website for further information.


