
Crochet Bouquet is About Variety

When I wrote Crochet Bouquet and my first book, Polymer Clay for Everyone, I wondered about my readers’ favorite colors. Would they like bright colors? Pastels? Dark colors? Browns and tans? Metallics?
The answer seemed to be YES. Think of any color, and somebody, somewhere, will love it. To please all the somebodies, everywhere, I set out to include a wide variety of colors and color combinations in my books.
The plan worked well for Polymer Clay for Everyone. The cover shows bright projects, but inside the book, every one of the color groups I mentioned (and more) is represented in the many different projects. By “and more” I mean glow-in-the-dark. My scary, bloodshot, glow-in-the-dark eye ball necklaces were brilliantly captured by photographer David Sherwin.

With Crochet Bouquet, I ran into a snag. Early in its childhood, the Art Department at Lark Crafts decided that Crochet Bouquet’s “look” would be bright and happy, with crisp white paper and designs with bright garden colors. And of course, it is beautiful. I’m glad they chose the bright, happy look.
I did crochet some designs in browns, metallics, and darker colors. I feel a little sad for those pretty designs, not being included in the book. So here they are. This is their moment to shine. I hope you like them.
These brown and cream flowers are called “Triple-Crowned.” You may recognize the petals as Trimmed and Picot Off-Center Rounds from pages 27-28 of Crochet Bouquet. They are sewn to a 15-dc circle and then the “crown” is added.
I made these with luxurious Crystal Palace Yarns: Party, Popcorn, and Cotton Chenille (the red/orange crown on one of the flowers). The feathers were from my parents’ guinea fowl. One Triple-Crowned is embellished with Mill Hill bugle beads.

The Stacked Flower is made with Loopy (pages 57-58 of Crochet Bouquet) and the Large Star Flower (page 92). The other flower in the stack didn’t make it into the book.
The large specimen was crocheted with Plymouth Yarns Alpaca Boucle and decorated with feathers from the craft store. The small flower is made with Coats Aunt Lydia’s Fashion Crochet Thread, size 5 (metallic). The medium sized Stacked Flower is Louet Euroflax Sport in brown, black, cedarwood, and green.
Would you like me to post the instructions for Triple-Crowned and the Stacked Flower? (You will still need Crochet Bouquet to make Loopy, the Large Star Flower, and Off Center Ovals).
(Polymer Clay for Everyone is out of print, but you can usually find it online. It was published in England under the title The Polymer Clay Sourcebook. Same contents, different cover. Oh, and also in France! Same contents, different language.)
A Brain Vacation

After finishing my book, Crochet Garden, back in May, my brain needed a break. Luckily, about that time, the Herrschners catalog arrived. It’s one of my favorite things to find in the mailbox. Even more luckily, an embroidery kit I had admired was on sale!
The kit was the Garden Beauty Table Runner by Village Linens. It has shaded lavender roses and other flowers and leaves. All the correct colors of embroidery floss and even a needle were included in the kit. Ahhh. So easy on the brain.
I embroider while my girls are in their piano lessons. Some evenings I do a few lengths of floss for relaxation. Eight-year-old Ella noticed how the same color floss looks like different colors when you hold the work a certain way. It’s the satin stitch that does that. I spend a lot of time admiring the effect.
The table runner may be done by the end of the year, but there’s no real deadline. Yay!
Holiday House Building 2

Around Christmas 2010, my brother Eric and family visited. We put them to work on the house right away! No, they wanted to work on the house. Really.

Alanna, Ella, and Marshall worked hard in the mud department. They checked our slurry by emerging their arms up to the elbow. You know the slurry is right if it looks like you have chocolate-colored gloves on. They made mud sculpture and they even planted themselves in our sand pile. Kids need a chance to play in mud from time to time, and this was the best chance ever.

Eric, Carolyn, Eva, and I continued building the walls up between the windows. Carolyn worked hard to level out the northwest corner, which tries to defy our efforts to keep it even.

The walls rose, making the house look more like a house than ever.
That was the last time we worked on the house for several months, because I had to write my book. Charles said, “The house will still be there when you’re done with the book.” Yes it was.

Good News!

After months in limbo caused by out-of-date software and an unexpected spam problem, Curious and Crafty Readers, the TextileFusion blog is back!*
I missed you all!
My good news is that the sequel to Crochet Bouquet is finished and at the publisher, Lark Crafts, for photography, layout, and editing.
Look for the new book and a whole slew of new Crochet-Alongs in Spring 2012.
* Originally, textilefusion.com had two blogs: one for book-related posts and one for all other posts. The book blog was titled “Curious and Crafty Readers,” and the other blog was “Suzann’s Textilefusion.”
Circles within Circles, Step by Step
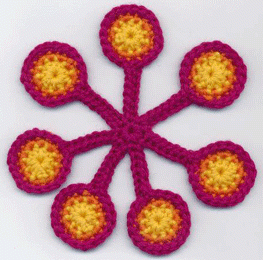
Sundews are cute little rosettes of narrow leaves which have round, sticky ends. Beware, small insects!
I remember geometric print fabrics with wonky asterisk shapes, which had circles on the ends. Nowadays, people call those fabrics “vintage.” Hmmm.
We saw fireworks last night that exploded into a flower shape, and then the end of each petal exploded again into a ball of sparkles.

What do these things have in common? They remind me of “Circles within Circles,” on pages 22-23 of Crochet Bouquet. First you make seven circles of two rounds each. Round 3 forms the spindly petals and joins the seven circles into a flower. Circles within Circles is best for applique because it can’t hold its shape naturally. It is our July 2011 Crochet Bouquet-Along. Here are some hints and photos to supplement the crochet instructions in the book.
With all these separate pieces, you can end with a lot of yarn ends. Better to crochet over the ends whenever possible, like this:

Work Rnd 1 as usual, and weave in the end that comes out of the center. Begin Rnd 2 opposite of where Rnd 1 ended, catching the yarn end from Rnd 1 in the first stitch. Photo A shows the first sts of Rnd 2 covering the yellow yarn end. Continue Rnd 2, crocheting over the yarn end.
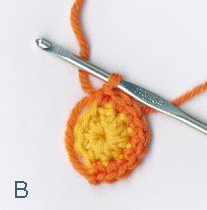
When you have crocheted half of Rnd 2, bring the yarn end from Rnd 2 around the edge of the circle, and catch it under the next stitch, as I did the orange yarn end in Photo B. Crochet over the yarn for the rest of Rnd 2.
Trim the ends of the covered yarns.

Round 3 starts with a chain ring and a sc in the ring. To make a petal, chain 7, then pick up one of the circles and start crocheting around it. I like to start very close to the end of Rnd 2, so I can catch its yarn end under the sts of Rnd 3 as soon as possible as in Photo C.

Once you have crocheted around the circle, work back across the chain to complete the petal. (Photo D)

In Photo E, all the petals are finished, and I’m about to needle join. As soon as the last sc was done, I cut the yarn and pulled the yarn end up out of the last stitch. Then I threaded it into a tapestry needle.

The first stitch of Rnd 3 is a sc in the ring. The needle join follows the direction of the yarn on top of that first sc. Photo F shows the needle following the top thread of the first sc under the top of the next st.

Tighten the yarn so it looks like part of the first st. Now insert the needle into the last stitch, where the yarn in your tapestry needle originates. Tighten the yarn again. I like to weave in the end on the back, in the direction of the crochet (in this case, up the back of the first petal). (Photo G)
A needle join is like making a duplicate stitch over the top of the first st of the round. When you’re finished, it takes a very good eye to find the beginning/end of the round.
Holiday House Building

This was the northwest corner of our earthen house before we started to work on the chilly Thanksgiving weekend of 2010. Our goal was to build up the walls between window openings on the north side of the house.

The short wall spans between windows were just the right size to make brick-laying fussy and difficult. A word of advice to others who want to build a compressed earth block house: plan the wall segments so you can lay the bricks in whole, instead of having to cut and piece.

We also contended with electrical conduit running through the walls. Eva is sawing a notch in this block, to fit around the conduit. Unfortunately, the sandy blocks wear away the saw’s teeth in a hurry. Sometime later, we switched to a bow saw with replaceable blades.

As the new walls rose, we tried to keep them level with the previous walls. Even when we used the same size bricks, the new walls weren’t always level with the old ones. Van and Kathy discovered a new, efficient way to reduce the height of a brick to level up walls: brush water on it and scrape it with a shovel. Works well for large areas!

It’s amazing how quickly the walls rise when they have big spaces in them. And it’s also amazing how the window openings make the place look so much more like a house.
We had a good weekend’s work. Thank you, Van and Kathy and Eva!
At the end of the day, the sun lit up these hawthorn berries in a little grove close to where we were working. I can hardly wait to live there!

Green Yarn Lost and Found
Green Yarn Lost and Found

I crocheted for my new book just about everywhere—at basketball games, at the Tuesday quilting bee, and at Dairy Queen. Maybe I’m the only person who crochets at our local Dairy Queen, because when a green ball of yarn was accidentally left on a bench there, one of my daughter’s friends knew it must be mine.
Unfortunately, the friend didn’t pick it up for me, but at least I knew where it had fallen out of my overstuffed yarn bag. After checking at Dairy Queen twice, I met only one person who remembered the green yarn. She couldn’t find it anywhere.
I needed that green yarn. It was Cascade 220, green #7814, a spring-like green with a bluish tint. It was the perfect green for a project in the book, and no other green yarn would do!
A few days later, I awoke before the alarm went off (so you know this yarn thing was bothering me). “Today,” I thought, “I am going to order green #7814 from the Knitting Nest in Austin. They have all the Cascade 220 colors, and it will be here in a couple of days and I can finish that project.”
We got ready for the day, and my girls and I started for the door on the way to school. Oops. The door wouldn’t open. We tried one thing, then another. We tried all the usual door-opening things, like taking the doorknob off and pulling out the catch (it wouldn’t budge). My dad came over and tried opening it from the outside. No joy.
I sighed and my shoulders slumped dejectedly. “Let’s move stuff from my sewing room so we can get out the back door,” I said sadly. If you saw my sewing room, you would understand.
We did. Everyone got to school on time. Charles and my dad had to take the door off the hinges so they could replace the catch. Luckily Dad saves stuff like door catches, so they found a replacement in his workshop.
I came back home to the bags and boxes from the sewing room. “I should deal with all these instead of just stuffing them back into the room,” I thought. “What’s in here, anyway?” I asked about one paper bag.
I peeked in. There was… green Cascade 220. Eva and I used it to make samples for a book we proposed a couple of years ago. Wow. It sure looked like green #7814. Could it be? I got out my notebook with labeled samples of yarns for my book. Flip, flip, flip. Ah. There was the Cascade 220 page. There was green #7814. And… AND… It was a match!
There are silver linings!
Crochet Bouquet Sequel Finished!

Since about October, I’ve been working on a new crochet book. On Tuesday, May 10, I mailed off the last package of samples, and emailed the last bit of text. What a relief!
Now it’s the publisher’s turn. The folks at Lark Crafts will photograph the samples and projects, edit the text, and lay it all out very beautifully.
Sometime in late summer I get to proofread the lasers. They used to be called galley proofs, when the text was all set by a typesetter. Nowadays everything is done on computers by experts at layout and design, and we get lasers instead of galleys.
The book will probably be available for prepublication ordering online early next year. About a year from now, we’ll find it at fine bookstores everywhere. It’s a lot of waiting. But so exciting!
Big and Small Popcorn in the Middle

What a difference the size of your thread makes!
I used a size 3 US steel (2.10mm) hook and Aunt Lydia’s No. 10 crochet cotton to make the tiny Popcorn in the Middle. It’s very sweet!
It’s about 1/4 the size of the same flower made in Caron’s “Country,” a light worsted weight yarn.
You can use any weight of yarn to make the flowers and leaves in Crochet Bouquet. Just remember:
- big yarn = big, showy flowers
- tiny yarn = tiny, sweet flowers.
And now to say the same thing in German and Turkish:
Groβes Fädchen, groβes Blümchen; kleines Fädchen, kleines Blümchen.
Büyük iple, büyük çiçek; küçük iple, küçük çiçek.

December 2010: Popcorn in the Middle CAL

Please join me this month in making Popcorn in the Middle, a six-petal flower on pages 88-89 of Crochet Bouquet.
Popcorn in the Middle is another design that you can customize by changing colors for every round of petals…or not! You can make it large by crocheting all the rounds, or small by stopping after Round 2. You can even leave off the last two rounds to make a medium-sized flower.
For this sample, I used the rich colors of Naturally Caron’s Country yarn. Round 1 is in the golden “Gilder Age” (color 0011), Rounds 2-5 are “Claret” (color 0017), and Round 6 is “Loden Forest” (color 0020). Country is a blend of 75% acrylic and 25% wool. (”Country” iple Türkye’de yaptı.)*
If you need help making this flower, please leave a comment.
Oh, the background of the photo is a big piece of calcite crystals. It’s fun to have a geologist in the family.
* I’m practicing my Turkish. I hope I wrote that “Country” yarn is made in Turkey.


