Circles within Circles, Step by Step
Sundews are cute little rosettes of narrow leaves which have round, sticky ends. Beware, small insects!
I remember geometric print fabrics with wonky asterisk shapes, which had circles on the ends. Nowadays, people call those fabrics “vintage.” Hmmm.
We saw fireworks last night that exploded into a flower shape, and then the end of each petal exploded again into a ball of sparkles.

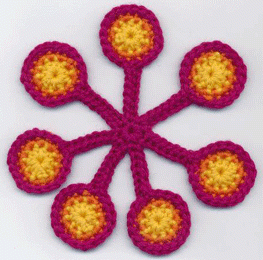
What do these things have in common? They remind me of “Circles within Circles,” on pages 22-23 of Crochet Bouquet. First you make seven circles of two rounds each. Round 3 forms the spindly petals and joins the seven circles into a flower. Circles within Circles is best for applique because it can’t hold its shape naturally. It is our July 2011 Crochet Bouquet-Along. Here are some hints and photos to supplement the crochet instructions in the book.
With all these separate pieces, you can end with a lot of yarn ends. Better to crochet over the ends whenever possible, like this:

Work Rnd 1 as usual, and weave in the end that comes out of the center. Begin Rnd 2 opposite of where Rnd 1 ended, catching the yarn end from Rnd 1 in the first stitch. Photo A shows the first sts of Rnd 2 covering the yellow yarn end. Continue Rnd 2, crocheting over the yarn end.
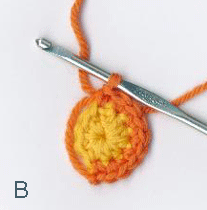
When you have crocheted half of Rnd 2, bring the yarn end from Rnd 2 around the edge of the circle, and catch it under the next stitch, as I did the orange yarn end in Photo B. Crochet over the yarn for the rest of Rnd 2.
Trim the ends of the covered yarns.

Round 3 starts with a chain ring and a sc in the ring. To make a petal, chain 7, then pick up one of the circles and start crocheting around it. I like to start very close to the end of Rnd 2, so I can catch its yarn end under the sts of Rnd 3 as soon as possible as in Photo C.

Once you have crocheted around the circle, work back across the chain to complete the petal. (Photo D)

In Photo E, all the petals are finished, and I’m about to needle join. As soon as the last sc was done, I cut the yarn and pulled the yarn end up out of the last stitch. Then I threaded it into a tapestry needle.

The first stitch of Rnd 3 is a sc in the ring. The needle join follows the direction of the yarn on top of that first sc. Photo F shows the needle following the top thread of the first sc under the top of the next st.

Tighten the yarn so it looks like part of the first st. Now insert the needle into the last stitch, where the yarn in your tapestry needle originates. Tighten the yarn again. I like to weave in the end on the back, in the direction of the crochet (in this case, up the back of the first petal). (Photo G)
A needle join is like making a duplicate stitch over the top of the first st of the round. When you’re finished, it takes a very good eye to find the beginning/end of the round.
Holiday House Building

This was the northwest corner of our earthen house before we started to work on the chilly Thanksgiving weekend of 2010. Our goal was to build up the walls between window openings on the north side of the house.

The short wall spans between windows were just the right size to make brick-laying fussy and difficult. A word of advice to others who want to build a compressed earth block house: plan the wall segments so you can lay the bricks in whole, instead of having to cut and piece.

We also contended with electrical conduit running through the walls. Eva is sawing a notch in this block, to fit around the conduit. Unfortunately, the sandy blocks wear away the saw’s teeth in a hurry. Sometime later, we switched to a bow saw with replaceable blades.

As the new walls rose, we tried to keep them level with the previous walls. Even when we used the same size bricks, the new walls weren’t always level with the old ones. Van and Kathy discovered a new, efficient way to reduce the height of a brick to level up walls: brush water on it and scrape it with a shovel. Works well for large areas!

It’s amazing how quickly the walls rise when they have big spaces in them. And it’s also amazing how the window openings make the place look so much more like a house.
We had a good weekend’s work. Thank you, Van and Kathy and Eva!
At the end of the day, the sun lit up these hawthorn berries in a little grove close to where we were working. I can hardly wait to live there!

Green Yarn Lost and Found
Green Yarn Lost and Found

I crocheted for my new book just about everywhere—at basketball games, at the Tuesday quilting bee, and at Dairy Queen. Maybe I’m the only person who crochets at our local Dairy Queen, because when a green ball of yarn was accidentally left on a bench there, one of my daughter’s friends knew it must be mine.
Unfortunately, the friend didn’t pick it up for me, but at least I knew where it had fallen out of my overstuffed yarn bag. After checking at Dairy Queen twice, I met only one person who remembered the green yarn. She couldn’t find it anywhere.
I needed that green yarn. It was Cascade 220, green #7814, a spring-like green with a bluish tint. It was the perfect green for a project in the book, and no other green yarn would do!
A few days later, I awoke before the alarm went off (so you know this yarn thing was bothering me). “Today,” I thought, “I am going to order green #7814 from the Knitting Nest in Austin. They have all the Cascade 220 colors, and it will be here in a couple of days and I can finish that project.”
We got ready for the day, and my girls and I started for the door on the way to school. Oops. The door wouldn’t open. We tried one thing, then another. We tried all the usual door-opening things, like taking the doorknob off and pulling out the catch (it wouldn’t budge). My dad came over and tried opening it from the outside. No joy.
I sighed and my shoulders slumped dejectedly. “Let’s move stuff from my sewing room so we can get out the back door,” I said sadly. If you saw my sewing room, you would understand.
We did. Everyone got to school on time. Charles and my dad had to take the door off the hinges so they could replace the catch. Luckily Dad saves stuff like door catches, so they found a replacement in his workshop.
I came back home to the bags and boxes from the sewing room. “I should deal with all these instead of just stuffing them back into the room,” I thought. “What’s in here, anyway?” I asked about one paper bag.
I peeked in. There was… green Cascade 220. Eva and I used it to make samples for a book we proposed a couple of years ago. Wow. It sure looked like green #7814. Could it be? I got out my notebook with labeled samples of yarns for my book. Flip, flip, flip. Ah. There was the Cascade 220 page. There was green #7814. And… AND… It was a match!
There are silver linings!
Crochet Bouquet Sequel Finished!

Since about October, I’ve been working on a new crochet book. On Tuesday, May 10, I mailed off the last package of samples, and emailed the last bit of text. What a relief!
Now it’s the publisher’s turn. The folks at Lark Crafts will photograph the samples and projects, edit the text, and lay it all out very beautifully.
Sometime in late summer I get to proofread the lasers. They used to be called galley proofs, when the text was all set by a typesetter. Nowadays everything is done on computers by experts at layout and design, and we get lasers instead of galleys.
The book will probably be available for prepublication ordering online early next year. About a year from now, we’ll find it at fine bookstores everywhere. It’s a lot of waiting. But so exciting!
Big and Small Popcorn in the Middle

What a difference the size of your thread makes!
I used a size 3 US steel (2.10mm) hook and Aunt Lydia’s No. 10 crochet cotton to make the tiny Popcorn in the Middle. It’s very sweet!
It’s about 1/4 the size of the same flower made in Caron’s “Country,” a light worsted weight yarn.
You can use any weight of yarn to make the flowers and leaves in Crochet Bouquet. Just remember:
- big yarn = big, showy flowers
- tiny yarn = tiny, sweet flowers.
And now to say the same thing in German and Turkish:
Groβes Fädchen, groβes Blümchen; kleines Fädchen, kleines Blümchen.
Büyük iple, büyük çiçek; küçük iple, küçük çiçek.

December 2010: Popcorn in the Middle CAL

Please join me this month in making Popcorn in the Middle, a six-petal flower on pages 88-89 of Crochet Bouquet.
Popcorn in the Middle is another design that you can customize by changing colors for every round of petals…or not! You can make it large by crocheting all the rounds, or small by stopping after Round 2. You can even leave off the last two rounds to make a medium-sized flower.
For this sample, I used the rich colors of Naturally Caron’s Country yarn. Round 1 is in the golden “Gilder Age” (color 0011), Rounds 2-5 are “Claret” (color 0017), and Round 6 is “Loden Forest” (color 0020). Country is a blend of 75% acrylic and 25% wool. (”Country” iple Türkye’de yaptı.)*
If you need help making this flower, please leave a comment.
Oh, the background of the photo is a big piece of calcite crystals. It’s fun to have a geologist in the family.
* I’m practicing my Turkish. I hope I wrote that “Country” yarn is made in Turkey.
I Finally Discovered Jelly Yarn!

Knitters and crocheters were talking about Jelly Yarn years ago. I finally tried it and wow! It’s fun!
I used superfine Jelly Yarn and a size E (US) hook to make this Ray Flower from Crochet Bouquet.
The prescribed way to block Jelly Yarn projects is to duct-tape them to a flat surface and place a heavy book on top for several hours.
For a small project like a flower, grip opposite petals and stretch for a count of 30, then moving to the next set of opposite petals, and the next, until all are stretched. Fold the top of each petal back, and then let it move back to the front on its own. Repeat if necessary.

The vinyl Jelly Yarn starts to stick to your hook after a while, making it difficult to crochet. Wipe your hook with a dab of lotion or Burt’s Bees Balm to make crocheting easier. It smells nice, too.
So what do you do with Jelly Yarn flowers? I’m thinking key fobs or ornaments. Any other ideas?
A Great Afternoon at Front Street Books

Charles drove me the three blocks from our hotel in Alpine to Front Street Books, where “A Crochet and Knitting Afternoon with Suzann Thompson” would start at 2 o’clock.
Why did we drive, when the weather was so nice? Because I had too much stuff to carry, as usual.

We spread flowers and flower projects on every surface, except for the few square feet that held snacks. I lingered over the flowers near this area, so I could breathe in the chocolaty goodness. Yum.
The talking started as soon as the first yarn lovers walked through the door, which won’t come as a surprise. We talked about yarn and where to buy it, the steps of writing craft books, and much more.
I showed my precious spiral-bound copy of Crochet Bouquet. Julie, the manager of Front Street Books, confirmed that book store owners do not like spiral-bound books. “They’re difficult to display,” she said.
“Besides, you can’t read the spines,” said Kay, who also showed a clever hand-held loom called a Weav-ette.

As we discussed yarns and technique, Susan sat crocheting a daffodil with a “How to Crochet” book peeking from underneath her copy of Crochet Bouquet. We were amazed at how quickly she learned to crochet. “Well, I knit,” she said modestly, to explain her quick mastery.

Many knitters I know use “I knit” as an explanation for why they can’t learn to crochet. Go figure!
After a while, our discussion broke into smaller groups and we helped ourselves to treats and coffee. Susan, twelve-year-old Kara, Alison and I had a crochet lesson. Julie’s aunt, also named Julie, almost finished a rib-and-shell hat she started that same afternoon.
It was a happy day.
Come to a Crochet Bouquet Event in Alpine, Texas

Please come and visit with me at an informal Crochet and Knitting Afternoon at Front Street Books in Alpine, Texas.
You’ll see lots of flowers and projects from Crochet Bouquet, and some samples that will be new to you. I will demonstrate techniques from the book and show you a really clever way to create plastic bag yarn.
Bring along your own project to work on while we talk and enjoy coffee and sweets served by Front Street Books.
If you have crochet or knitting questions, I’ll do my best to help you.
Time:
2-5 p.m., Saturday, November 13, 2010
Place:
Front Street Books Reading Room
201 E. Holland Avenue
Alpine, Texas 79830
432/837-3360
Fax: 432/837-1126

See you there!
Ray Flower, Step by Step

Four years ago this month, we visited beautiful Alpine, Texas. My husband drove and I sat in the passenger seat, designing the Ray Flower (pages 31-32 of Crochet Bouquet). Next week, I’ll be going to Alpine again. This time, it’s for a crochet and knitting afternoon and book-signing at the incomparable Front Street Books (fsbooks.com).
It seems right to feature the Ray Flower in this month’s crochet along.

In the Ray Flower, you always work with only one yarn at a time, even though one row looks like it may have two yarns going at once. These step-by-step photos show you how it’s done. They are meant to supplement the crochet instructions in the book.

Colors alternate for four rounds of single crochet, in the center of the flower. Instead of cutting the color after each round, end it off but do not cut. Photo 1 shows Round 2, all finished and joined with a sl st. I opened the last loop enough to slip the skein of yarn through it. Now it’s ready for the next round. Photo 2 shows how it looks from the back.

Photo 3 is the Ray Flower, with Round 5 completed.

For Round 6 (Photo 4), you fold Round 5 out of the way, so you can stitch in the skipped stitches of Round 4.

Then you bring Round 5 back up and sc in the tops of its dc-sts, as in Photo 5.
Photo 6 shows Round 7 finished, except for the needle join. I love the needle-join, because you can’t see where the round begins or ends—very slick!

As you can see, I cut the yarn and pulled the last loop straight out of the top of the sc. The instructions say to “needle-join to first st of rnd.” The first st of the round is a ch-st, indicated by the orange arrow. The yellow arrow shows where to insert the tapestry needle, after you have threaded the yarn end in it.

With a needle-join, you are following the path of the top loop of the stitch you are joining to. So you insert the tapestry needle from the front, following the loop to the back, and then you insert the needle into the top of the stitch you just finished crocheting. (Photo 7)

For sc, dc, and treble, you should catch two threads in the back, before you weave in the end in the direction of the yellow arrow in Photo 8. For a ch st, there’s only one loop to catch before you weave in; for a hdc you needl to catch three threads. Look closely at Photo 8 to see the two threads the needle join catches.
For this sample of the Ray Flower, I used Lion Brand Yarns, LB Collection Cotton Bamboo. It’s soft with an attractive sheen.