Oval Center Rose Tutorial
(This was originally published at Suzann’s TextileFusion, back when Curious and Crafty Readers was having technical difficulties. It really belongs here, so here it is!)*
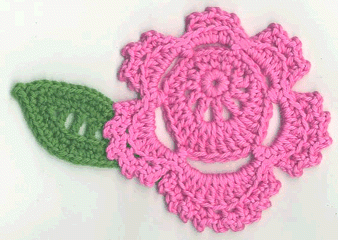
My cousin Phyllis was paging through Crochet Bouquet, when she saw the Oval Center Rose on pages 28-29. “Is this photographed at an angle, or does it really look like that?” she asked.
Yes, it does! It is photographed straight-on, and it really is oval, like so many of the stylized roses I see on china, tin boxes, and other decorative objects.
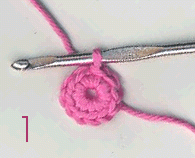
The Oval Center Rose is our crochet along project for May. It starts with a round of single crochet (Photo 1). The lovely pink yarn is Universal Yarns Cotton Supreme.
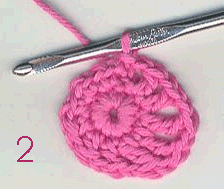
The Rose starts going oval in Round 2 (Photo 2), with graduated stitch heights. To give the flower a lighter appearance, this round has ch-spaces between the stitches.
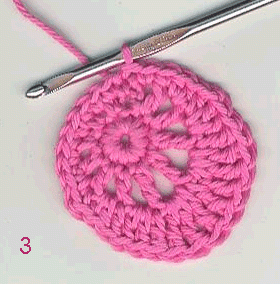
Photo 3 shows the last round of the oval center. The graduated stitch heights make the oval even longer.
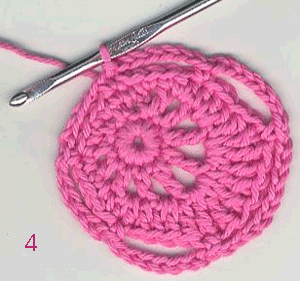
Round 4 (Photo 4) sets up the petals of Round 5. The sc-sts between the ch-loops serve as anchor sts for Round 6.
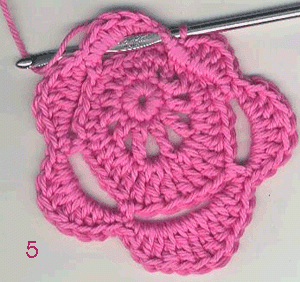
In Photo 5, you see Round 5 finished, except for the final joining ch-st. It is worked around the first sc of Rnd 4 (an anchor st). To do this, take the hook behind your work, insert it under the petal you just finished. Now take the hook in front of the anchor sc, and back to the back under the next petal. Yarn over and draw the loop around the stitch and through the original loop on your hook.
Round 6 is where you add the final ruffly finish, worked in the back loops only. That’s what creates the subtle outline around the stitches of Rnd 5. The first petal is different than the others, so check the instructions.
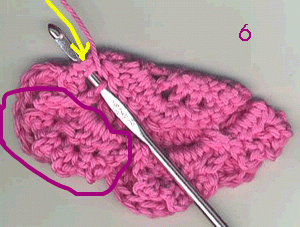
To keep the petals from melding together on this last round, you ch 2, sl st around the anchor stitch, ch 2, between the petals. Sometimes it’s easier to fold the flower at the anchor stitch, and sl st around it from the back, as in Photo 6. The plum circle surrounds the 2nd petal, and the hook is under the anchor stitch, to which the yellow arrow points.
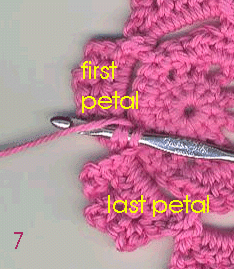
At the end of Rnd 6, turn the flower to the back. Find the very first anchor stitch with the sl st around it. Insert your hook under the loops of this sl st, yoh, and complete another sl st. In Photo 7, you’re looking at the back of the rose, and the hook is under the loops of the sl st around the first anchor st. All that’s left to do is finish the final sl st, end off, and weave in the ends.
* Originally, textilefusion.com had two blogs: one for book-related posts and one for all other posts. The book blog was titled “Curious and Crafty Readers,” and the other blog was “Suzann’s TextileFusion.”
Lentils vs. Lintels

These are lentils. Make the recipe at the end of this post, but only if you approve of eating pork.
You can buy these lentils, inexpensively, at the grocery store. Unfortunately, they won’t hold up a wall over windows and doors. For that, you need lintels.

Our lintels are heavy and strong enough to hold up a two-foot wide earthen wall over the window openings. They are so heavy that my Dad lifted them over our windows with the tractor. He had to do some pretty fancy maneuvering to put the last one in place, over the window on the back-porch side of the house. He managed.

Eva and Jerry lifted the lintels off the tractor forks and rested them on blocks above the windows. There were seven of them, so you can imagine how happy they were when they unloaded the last one.

Later, Jerry and I leveled the walls on either side of the window by scraping them with trowels. Then we poured lots of mud slurry onto the walls and replaced the lintels. I think next time we’ll have the walls all leveled first. Then we’ll pour slurry and permanently place the lintel straight from the tractor. Live and learn!

SAVORY LENTILS WITH SAUSAGE
from a British newspaper or magazine, with changes
This recipe may have been developed originally by Carola Weymouth.
1 lb brown lentils
5 oz bacon, chopped
1 large or 2 medium onions, chopped
4 sticks celery, chopped
4 carrots, chopped
6 garlic cloves, minced or pressed through a garlic press
1 lb mushrooms, sliced
Salt and black pepper to taste
1/4 cup balsamic vinegar (or to taste)
1/3 cup fresh parsley, chopped
1 Tbsp olive oil
4 sweet Italian, Cumberland, or other good sausages
- Rinse and pick over the lentils. Put them in a saucepan with enough water to cover them by about 1”. Bring to a boil, then reduce heat to simmer the lentils until the instructions call for them.
- Fry bacon in a large skillet for about 3 minutes, then add onions, celery, and carrots. Cook together over medium heat until bacon is done, onions are translucent, and other vegetables are tender. Add garlic and mushrooms, cover, and cook for a few minutes.
- Add the simmering lentils and water to the bacon and vegetables. If necessary, add enough water to cover the lentils by about 1/2 inch. Cook over medium heat for 15-20 minutes.
- While the lentil mixture is cooking, in another skillet, heat oil and brown and cook the sausages.
- Season the lentil mixture and stir in vinegar and parsley.
- Serve the sausages with the lentils. Keep leftover lentils in the refrigerator. They are great cold for lunch or a snack.
Polymer Clay Button Class in Greensboro

It’s going to be polymer clay paradise at the Knit & Crochet Show in Greensboro, NC, in September!
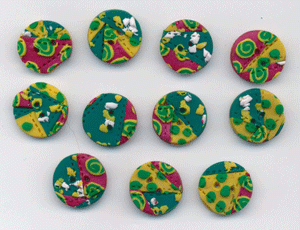
I’m teaching two six-hour classes of polymer clay button-making techniques:
In Polymer Clay Button Boutique 1, we’ll make colorful and easy swirl buttons, lapis-lazuli-like buttons. We’ll go into groups of two or three to work on an easy millefiori technique, resulting in buttons like the ones pictured above. (You’ll have a choice of several different shapes for your buttons.) Then, after lunch we will make Crazy Polymer Patchwork Buttons like the ones in the photo to the right. We will end by making flower appliqué buttons.

Ella was about five years old when I made the buttons you see here. She used up my scraps to make this Polymer Clay Guy. Kids + polymer clay = Creativity Squared!
To find out more about the Knit & Crochet Show in Greensboro, NC, September 23-25, 2011, visit http://www.knitandcrochetshow.com, and look for details about the Fall Show. You can register online.
An Exciting Week

Yes, it has been an exciting week here at Curious and Crafty Readers..*
Rachel at Crochet Spot published an article about the htr (half treble crochet) stitch, which is used in several flower and leaf patterns in Crochet Bouquet.
Thank you to Rachel for her wonderful guest writer program!

Last year I found out that the Spanish language rights to Crochet Bouquet had been bought, but I knew nothing more about it until this week. Marta, a friend on Ravelry, told me that she bought the Spanish edition of Crochet Bouquet. She embellished a lovely scarf with one of the flowers from the book.
Luckily the Spanish title had two Os, which were represented by flowers, just like in the American edition. Muy bien!
* Originally, textilefusion.com had two blogs: one for book-related posts and one for all other posts. The book blog was titled “Curious and Crafty Readers,” and the other blog was “Suzann’s TextileFusion.”
Sweetness and Foolishness

Eva’s friend Vanesa turned 15 this summer. Eva went to her Quinceañera and had a wonderful time. This totally sweet little crocheted dress pin was a party favor. Eva said there were also crocheted hat and fan party favors. I’ll bet a lot of Vanesa’s lady relatives got together and had a crochet party-favor party! Sweetness!

Ella is making a quilt from 5-inch wide patches cut from our large collection of scraps. She sewed pairs of patches into a long garland. Look at her at the sewing machine—sweetness!
Naturally, she had to wear the patch garland. That’s foolishness.

And now for complete and utter foolishness. I bought a cookie press in hopes of squeezing mud mortar into narrow openings between bricks that somehow didn’t quite get enough mud between them.

Eva was going to take care of that job for me. She felt that the star-shaped cookie press would work well for remedial mortar work.
Eva practiced first, making sure she had the correct consistency of mud slurry to do the job. Wait a minute?! What job are we talking about here?
Well, I was talking about filling in between bricks with mud mortar. The job Eva had in mind was making large families of cute little star-shaped mud cookies. Foolishness!
Making Faces at the House Site

Our friends Gail and Beau visited in June. We talked, took care of goats and chickens for a neighbor, ate, talked a lot more, worked on the house, discussed science and social studies, and took a side trip to Austin. It was a great visit!

While we finished building the walls between the window openings, Ella played in the sand pile. We use one part sand to three parts dirt for our slurry that holds the bricks together. She found another use for it: making faces.
“Mom, I bet we could sell these!” she said. But sadly, time proved them to be too brittle.

Our goal was to build the walls up to the point where we could install lintels. Lintels support the wall above window and door openings. Eva and Gail worked on a corner that included the support wall for an arch on the inside. Beau worked on a wall section just beyond the last window.

Gail and Beau know a lady who is building a cob house (mix mud and straw, form into walls by hand). She hosts workshops, where people learn about cob and practice the technique. “You could have a compressed-earth-block building workshop where people would pay to come and build your walls!” Gail suggested. Hmmmm. That sounds pretty good. I’ll have to look into that.

We rewarded our own hard work with a trip to Austin for fun. We talked, we ate, we visited interesting shops on South Congress. At St. Vincent de Paul Thrift Store, I had to take a photo of this button-covered shoe rack, the ultimate eye-candy for two button makers and enthusiasts like me and Gail.
Crochet Bouquet is About Variety

When I wrote Crochet Bouquet and my first book, Polymer Clay for Everyone, I wondered about my readers’ favorite colors. Would they like bright colors? Pastels? Dark colors? Browns and tans? Metallics?
The answer seemed to be YES. Think of any color, and somebody, somewhere, will love it. To please all the somebodies, everywhere, I set out to include a wide variety of colors and color combinations in my books.
The plan worked well for Polymer Clay for Everyone. The cover shows bright projects, but inside the book, every one of the color groups I mentioned (and more) is represented in the many different projects. By “and more” I mean glow-in-the-dark. My scary, bloodshot, glow-in-the-dark eye ball necklaces were brilliantly captured by photographer David Sherwin.

With Crochet Bouquet, I ran into a snag. Early in its childhood, the Art Department at Lark Crafts decided that Crochet Bouquet’s “look” would be bright and happy, with crisp white paper and designs with bright garden colors. And of course, it is beautiful. I’m glad they chose the bright, happy look.
I did crochet some designs in browns, metallics, and darker colors. I feel a little sad for those pretty designs, not being included in the book. So here they are. This is their moment to shine. I hope you like them.
These brown and cream flowers are called “Triple-Crowned.” You may recognize the petals as Trimmed and Picot Off-Center Rounds from pages 27-28 of Crochet Bouquet. They are sewn to a 15-dc circle and then the “crown” is added.
I made these with luxurious Crystal Palace Yarns: Party, Popcorn, and Cotton Chenille (the red/orange crown on one of the flowers). The feathers were from my parents’ guinea fowl. One Triple-Crowned is embellished with Mill Hill bugle beads.

The Stacked Flower is made with Loopy (pages 57-58 of Crochet Bouquet) and the Large Star Flower (page 92). The other flower in the stack didn’t make it into the book.
The large specimen was crocheted with Plymouth Yarns Alpaca Boucle and decorated with feathers from the craft store. The small flower is made with Coats Aunt Lydia’s Fashion Crochet Thread, size 5 (metallic). The medium sized Stacked Flower is Louet Euroflax Sport in brown, black, cedarwood, and green.
Would you like me to post the instructions for Triple-Crowned and the Stacked Flower? (You will still need Crochet Bouquet to make Loopy, the Large Star Flower, and Off Center Ovals).
(Polymer Clay for Everyone is out of print, but you can usually find it online. It was published in England under the title The Polymer Clay Sourcebook. Same contents, different cover. Oh, and also in France! Same contents, different language.)
A Brain Vacation

After finishing my book, Crochet Garden, back in May, my brain needed a break. Luckily, about that time, the Herrschners catalog arrived. It’s one of my favorite things to find in the mailbox. Even more luckily, an embroidery kit I had admired was on sale!
The kit was the Garden Beauty Table Runner by Village Linens. It has shaded lavender roses and other flowers and leaves. All the correct colors of embroidery floss and even a needle were included in the kit. Ahhh. So easy on the brain.
I embroider while my girls are in their piano lessons. Some evenings I do a few lengths of floss for relaxation. Eight-year-old Ella noticed how the same color floss looks like different colors when you hold the work a certain way. It’s the satin stitch that does that. I spend a lot of time admiring the effect.
The table runner may be done by the end of the year, but there’s no real deadline. Yay!
Holiday House Building 2

Around Christmas 2010, my brother Eric and family visited. We put them to work on the house right away! No, they wanted to work on the house. Really.

Alanna, Ella, and Marshall worked hard in the mud department. They checked our slurry by emerging their arms up to the elbow. You know the slurry is right if it looks like you have chocolate-colored gloves on. They made mud sculpture and they even planted themselves in our sand pile. Kids need a chance to play in mud from time to time, and this was the best chance ever.

Eric, Carolyn, Eva, and I continued building the walls up between the windows. Carolyn worked hard to level out the northwest corner, which tries to defy our efforts to keep it even.

The walls rose, making the house look more like a house than ever.
That was the last time we worked on the house for several months, because I had to write my book. Charles said, “The house will still be there when you’re done with the book.” Yes it was.

Good News!

After months in limbo caused by out-of-date software and an unexpected spam problem, Curious and Crafty Readers, the TextileFusion blog is back!*
I missed you all!
My good news is that the sequel to Crochet Bouquet is finished and at the publisher, Lark Crafts, for photography, layout, and editing.
Look for the new book and a whole slew of new Crochet-Alongs in Spring 2012.
* Originally, textilefusion.com had two blogs: one for book-related posts and one for all other posts. The book blog was titled “Curious and Crafty Readers,” and the other blog was “Suzann’s Textilefusion.”