Gambel Oak Leaves: A Photo Tutorial

Patricia, a crocheter who contacted me through Ravelry, asked for clarification of the instructions for the Gambel Oak Leaves on pages 21-23 of Crochet Garden. Thank you for asking, Patricia!
We’ll start with the Small Leaf (page 23). You will need the book for complete stitching instructions:

Both Gambel Oak leaves are made with long rows that comprise the lobes (always odd-numbered rows) and short rows which are the spacers between the lobes.
Here are the first two rows of the Small Leaf. Row 2 has a long turning chain, because Row 3 is a long row. Some of the sts of Row 3 are on the chain, and some are made into the sts of Row 2, as you can see from the marks on the photo.

Row 3 is finished, and includes a turning ch for Row 4.

These are the rows through Row 5.
Design Note:
Think about a ripple afghan. To make the bottom of the “V” in a ripple afghan, we decrease stitches to pull up the stitches on each side of the bottom point, to make the V. By decreasing at the center of the leaf, we’re pulling the lobes up from the bottom point of the leaf. We’re making half of a V.
Also, in Rows 1-4, the stitches toward the center of the leaf are long. Rows 5-9 have sc or sl st as the last st toward the center of the leaf. The short stitches curve the lobes around the top of the leaf to start down the other side.

After the last st of Row 9, we join to the first half of the leaf with a sl st in the base of Row 5. The base of Row 5 is the stitch in which the last st of Row 5 was made.
Then ch 1, sl st into the base of Row 4. The base of Row 4 is as close as you can get to the first ch of the turning chain at the end of Row 3 (which leads up to Row 4). The marks show the base of each row you need to stitch into.

This is what the leaf should look like at the end of Row 9, just before you turn.

For Row 10, skip the sl sts that join to the center of the leaf, and work sts as shown.

Row 11 is done, and this shows where to join in the base of Rows 3 and 2.
Design Note:
Back to the idea of a ripple afghan. To form the peak of a chevron in a ripple afghan, we increase stitches at the top. This pushes down the stitches on either side of the peak to make an upside-down V or arrow point ?.
Hold the leaf, with the top lobe pointing down. The lobes join at the top of the peak. That is why, on this side of the leaf, working from tip to base, we increase sts close to the center of the leaf. We do it to push the lobes down toward the tip of the leaf.
Think about it this way: an increase is an upside down decrease; a decrease is an upside down increase. This is a good thing to know when you’re designing your own patterns.

Row 13 is finished and joined to the base of Row 1. Now we’re ready to make the stem.

After crocheting the stem, take the yarn to the wrong side of the leaf. Read the full instructions for making the central vein, page 22.

Working up the middle of the leaf, insert the hook from front to back, yo at the back, make ch sts where the space is long, if you’re close to a joining stitch, sl st in that st. Work these ch and sl sts until you are at the base of the top lobe. Cut yarn and pull to front.

Insert the hook from wrong side to right side at the point where the yarn comes out of the leaf, but do not insert the hook in the last ch st. Yo with the cut end and pull it to the back. The last ch st will prevent the stitches from unraveling. Weave in ends.

Here’s the Large Leaf (instructions begin on page 21), worked through Row 11. The marks show the bases of the rows where the lobes are joined with sl sts.

Row 11 is joined with a sl st in the base of Row 7.

This shows where to place the sts of Row 8.

When you finish crocheting the leaves, the lobes curl into themselves, so as you block, be sure to stretch the end of each lobe to pull them out to their proper shape.
To block small pieces like this, I hold them under the water tap for a few seconds, squeeze out excess water, stretch each lobe, and finally hold a hot iron over them, barely touching the crochet. Sometimes I use a damp press cloth to protect the stitching as well as add more steam.
Perspective Daisy Table Mat Finally Finished

I enjoy getting together with family on weekends and “watching” football. Why did I put “watching” in quotes? Because I usually only look at the TV when people get excited, hoping that whatever fantastic play just happened will be shown again. Sound familiar, my fellow knitters and crocheters?
Yep, I’m usually working on some kind of project. But it can’t be too complex, because that would keep me from listening to the conversation and the commentary. So the project for this season has been Crochet Charm Lace.

Last weekend, as we watched the Texas Longhorns play football, I finished the Perspective Daisy table mat. I’m still debating whether to add more filler motifs. Before I decide, it needs to be used for a while. That way, I’ll be able to see where they are needed most.
On to the next project!

The Perspective Daisy pattern is from Crochet Garden: Bunches of Flowers, Leaves, and Other Delights. Follow the progress of the Perspective Daisy table mat project in these posts about Crochet Charm Lace.
Third Grade Art Days

I was the lucky one on October 23! My daughter Ella and I spent a busy morning with third graders at an Austin-area elementary school for Art Days. This is Ella at the beginning of the day.
Parents spent weeks organizing and preparing for Art Days, and funded the purchase of most of the supplies, and organized visits by visual artists, musicians, actors, and authors.
My work room was all ready to go with a gallon of school glue and an 8 x 10″ canvas for each student. Ella and I brought buttons, beads, sequin trims, felt, and crocheted bits and pieces. I had lots of…let’s call them crocheted beta-flowers. They were the part of the process of designing flowers for my books. I didn’t want to throw them away, so they sat on my storage shelves for years. It’s a good thing I saved them, because look what those third graders did with the supplies!


This is “Superman with a Zipper.” See the green sequin “S” for Superman?


Ella finally got to decorate her own canvas, after helping two sets of third-graders.

Third graders, hard at work.
Cute Crochet World’s Owl Makes Artistic Debut
Owls are so cute! Crocheters love them, if #crochetowls on Instagram is anything to go by, or have a look at crocheted owls on Google Images for an amazing variety of big-eyed birds.
To quote the famous sonnet writer, Elizabeth Barrett Brownyarn, “How do I crochet an owl? Let me count the ways. Oh, wow. There are lots of ways to crochet an owl!”
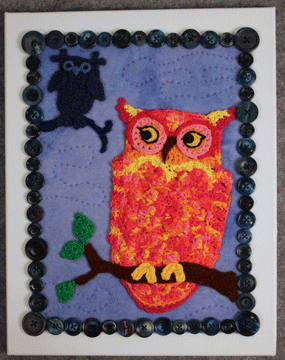
Night Owl, Bright Owl, ©2014 by Suzann Thompson,
commissioned by the friend of a bride who loves owls.
Crocheted Forget Me Not Step-By-Step

Today is National Forget-Me-Not Day! Who knew? Many thanks to Vintage Belle Broken China Jewelry, on Facebook, for bringing this to my attention! National Forget-Me-Not Day reminds us to get in touch with friends and relatives that we don’t see very often.
What better day to bring you a tutorial for the Forget Me Not flower on pages 86-87 of my book Crochet Garden? You’ll need a small amount of yellow yarn for the center, white or very light blue for Rnd 2, and sky blue for the petals. These photos and hints are meant to supplement the crochet instructions in the book.

Draw up a loop (as in photo). Now you have three loops on your hook, which is exactly what you need to finish the double crochet. Work the rest of the stitches of Rnd 2 in the front loops only of Rnd 1.

Here’s Rnd 2 all finished, with the yarn ends woven in. Do you see the stitches of Rnd 1 that have no stitches of Rnd 2 in them? We’re going to call those “free sc”s.

Rnd 3 is worked in the back loops of the stitches of Rnd 1, so you need to fold Rnd 2 to the front, completely out of the way, and insert your hook behind Rnd 2 into the back loops of Rnd 1. The first stitch of Rnd 3 goes in any “free sc” of Rnd 1.

When you’re finished with Rnd 3, it looks like this from the front…

…and like this from the back, for a total of 15 sc.

Rnd 4 begins with ch 1, and then a sc in the first “free sc” of Rnd 1. The sc will seem fat and tall, because it is created around the sc of Rnd 3, and the ch of Round 2 at that point. Both those stitches will be hidden from view by this new sc.

Now it’s time for a little multitasking. Work the next three stitches by inserting your hook into the next chain space of Rnd 2 AND also in the next sc of Rnd 3. The ch-sts of Rnd 2 will be hidden inside these three sts.

The next two sts go into the next tr of Rnd 2. Ah, simple.

Once again, you’ll be multitasking for the next three sts. They are worked into the next ch-sp of Rnd 2, AND in the next st of Rnd 3.
Whew! Done with one petal and ready to start the next petal with sc in the next free sc of Rnd 1. Four more petals, and you’re done!
I added some Ladder Leaves (page 71 of Crochet Garden) and filler motifs to my little Forget Me Nots, to create this piece of Crochet Charm Lace.

Firewheel Meadow Finished in Time

I wish September began with a P, so we could use it in this catchy name: Productive Peptember. Okay, I’m laughing, because it looks so funny in print. Microsoft Word doesn’t have a synonym for “productive” that begins with S, so I’m off to the true synonym master, Roget.
No joy from Roget’s Thesaurus, either. So let’s say that I got a lot done in September: two magazine articles and one magazine design, which I’ll tell you about when they appear.
AND the Firewheel Meadow wall hanging, which I have been posting about in progress. I sewed the last stitch on September 30, the day before it was due at the Threads of Texas Quilt Show.
And I’m so glad it was done in time, because it won third place in the Mixed Media, Small Quilt division.
Happy Halloween 2014

Have a cutely spooky Halloween!
Love, Cute Crochet World
P. S. Bat pattern on pages 34-35. Also find a pumpkin, jack-o-lantern squash, archy cat with moon behind it.
A Good Day at the Quilt Show

My mom and I went to the Threads of Texas Quilt Show on October 3 to see all the beautiful quilts made mostly by members of the Town & Country Quilt Guild of Stephenville, Texas.
We hadn’t even made our way to the quilt exhibit, before my friend Hazel saw us. “Have you looked at the quilts yet?” she said.
No, we hadn’t.
“Then I’m not going to say a word,” she said, “because I don’t want to spoil anything for you.”
How tantalizing.

Four and a half long rows of quilts greeted us as we walked into the exhibition hall—hours of lovely, colorful entertainment. The skill and talent in that big room, the time invested in making those quilts, the effort of putting together a show, were mind-boggling.
We turned to the right, toward the first row of quilts, to take them in one by one. We soon came upon the Mixed Media division, where my quilts were hung.
Here’s what we saw. You can imagine the happy texts to my husband and daughter, and the big smiles that lasted well into the weekend.


The black and yellow ribbon is from National Quilting Association Certified Judge Marilyn Hardy, who judged the show and awarded all the ribbons. Usually one NQA CJ ribbon is awarded in a show, and the recipient’s quilt is posted on the NQA CJ ribbon website. I hope you’ll go look—there are lots of great quilts on the page.

Memories Monday, Recycled Sweater Vest

I placed a darkly colorful man’s sweater on the thrift-shop counter. The cashier looked at me apprehensively. “Do you realize this sweater is 100 percent wool?” she asked.
Yes, I did. That’s why I bought it. Frankly I was amazed that such a wonderful sweater was still on the shelf, but apparently the wool content wasn’t as attractive to other people. The price was right, too. It was about five dollars.
Wool is perfect for TextileFusion projects. It takes heat well, which is important because I stabilize the knitted fabrics with fusible interfacing. Since wool threads tend to cling to each other, wool is good for cutting into pieces.
For this vest, I cut the facings and hems off of a commercial sewing pattern, and used it to cut vest pieces from the sweater. I stabilized with fusible interfacing and machine stitching. My current favorite mother-of-pearl buttons were perfectly subtle embellishment for the vest. I added other buttons and trims, too.
Four Flowers a Day

The Firewheel Meadows quilt is due at the 2014 Threads of Texas Quilt Show on October 1. So far, I’m making steady progress toward the finish line by appliqueing four flowers a day onto the quilt. See the flowers at the left of the picture, with the petals curling up slightly? Those are the ones sewed today.
At four a day, I’ll finish with the flowers on Tuesday, September 16, which gives me plenty of time to do more embellishment, sew on the label, and finish the hanging sleeve, AND finish two other projects by the end of September!
Oh, but some days it’s difficult to sit down and sew four flowers. I’d rather be doing something else, like reading stuff on the internet or sneaking a game of 2048 on my daughter’s iPad.
The process is character-building. Yes, that’s what it is.