
Step-by-Step Rafflesita

The Rafflesia is a great big flower—about 3 feet across. It’s the inspiration for this tiny version, called “Rafflesita.” The “-ita” means little. The pattern for “Rafflesita” is on pages 122-123 of Crochet Garden: Bunches of Flowers, Leaves, and Other Delights. These photos and notes are meant to supplement the instructions in the book.
The samples in Crochet Garden are each crocheted from one variegated yarn. These photos show a flower made with several colors, so you can see the different parts of the flower better. Besides, it looks pretty good.

Rnds 1 and 2 are straightforward rounds of double crochet. Rnd 3 is worked into the Front Loop (FL) Only of Rnd 2. It forms a support for the final round of the flower. Rnd 4 is worked into the Back Loop (BL) Only of Rnd 2. You will work the petals and the final round of the flower into Rnd 4.

Here’s the first petal done, and the second petal begun. This is the “ch 6” of 5A in the pattern. The chain takes you away from the flower center.

Continuing 5A, you work back toward the flower center, along the ch, and join to the BL of the next st of Rnd 4.

Instruction 5B has you stitching away from the flower again.

And 5C has you coming back toward the center, and joining with a sl st in the BL of the next st of Rnd 4.

Crochet away from the flower in 5D.

Crochet back toward the center for 5E, but pay attention here, because you’re going to skip one st of Rnd 4, before joining with a sl st in the BL of the next st.

Back out one more time with 5F.

Toward the flower center one last time for 5G, and you’re done with the next petal.

When the petals are complete, slip stitch around each petal as described in Rnd 6. If you find that 16 sl sts across the top are too many or too few, please alter the pattern to suit you.

To begin Rnd 7 with a dc, place a slip knot on your hook (as if you were starting a new project), yo hook, and draw up a loop in any FL of Rnd 4. Now you have 3 loops on the hook. Finish the dc as usual.
The FLs of Rnd 4 are pretty easy to see in this photo. They are the line of loops just inside the petal row.

Rnd 7 is worked from the top of the flower. If you’re a right-handed crocheter (meaning you hold the hook in your right hand—doesn’t matter which hand you write with), proceed in the direction of the arrow in this picture.

For me, it was easiest to fold the petals back and hold them with my thumb.

When you’re finished with Rnd 7, cut the yarn and pull the final loop out of the top of the last st (A in photo). Thread the yarn into a needle, and take the needle under the top lps of the 2nd st of the rnd (B in photo).

Take the needle down into the top of the final stitch, where the arrow is pointing in the photo. Tighten the loop to make it the same tension as the other stitches. Weave in the ends.

Rafflesita’s center is like a little bowl, where you can store small things, like these fossils.
Cute Crochet World Umbrella Tutorial

You probably heard about the rain we had in Texas over the last month. One big question at our house was, “Where did we put the umbrellas?” We haven’t really needed them for the past couple of years. I’m not convinced they would have kept anyone especially dry, with all the wind we had…
Considering the rain and hail and winds, it was much better to be inside crocheting an umbrella, rather than outside using one. This Umbrella is from Cute Crochet World, pages 78-79. Here are some tips and photos to supplement the instructions in the book.

Cute Crochet World’s Umbrella has a lot in common with the traditional Irish Crochet leaf (find instructions for this modified version in Crochet Bouquet: Easy Designs for Dozens of Flowers). You crochet them using a Turn-and-Twist method (my name for it). At the end of a row, you turn and crochet the first part of the next row. In the middle of the next row you rotate (or twist) the piece, work down the other side of the piece, then turn again to begin the next row. Confused? Here are pictures.

Row 1 is finished in the photo above. It includes the U. S. htr stitch, which is a little taller than a dc and a little shorter than the tr. Read more about it here and here.
I put a safety pin on the right side of Row 1, so you can easily see when we’re turning for a new row as opposed to rotating or twisting in the middle of a row. After Row 1, TURN to begin Row 2.

I am a few sts into Row 2 in this photo. The sts are worked into the Back Loop, which creates the ribbed look of the Umbrella. The arrow points to the ch-2 loop at the top of the umbrella. The dots show where to place the remaining sts of Row 2.

Alright, in Photo 3, I’ve placed 3 sc into the ch-2 loop, ROTATED the piece, and I’m ready to crochet the rest of Row 2 into the foundation chain of Row 1.
Row 1 had 7 sts, and there’s a chain loop at the base of each of these sts. Those chain loops are where the remaining sts of Row 2 are worked. There is an increase still to go, so watch for it in the instructions. Don’t worry about crocheting into the back loop here, because there aren’t any true back loops.

After Row 2, TURN to begin Row 3. The arrows show how the sts will go: across, over the top, ROTATE to work along the other side of the piece. All sts are worked into the Back Loop.

Row 4 begins with a joined tr. You’ve probably noticed how the ch-4 turning ch of a tr row often flops around loosely at the start of the row. The joined tr solves the problem. The ch-4 turning chain is considered a tr-st, so it counts as the stitch in the first st of the row.
Photo 5 shows ch 4 (turning ch), yo, draw up a loop in 3rd ch from hook, draw up a loop in next st. The result is 4 loops on the hook, just like a regular tr. Work off the loops as you would for a tr.

Row 3 is finished. See how crocheting into the Back Loops has created an impression of umbrella ribs? Now TURN to begin Row 4.

In Photo 7, Row 4 is finished, and I have TURNED to begin Row 5. Row 5 starts with a ch-3 turning ch, which counts as the first stitch of the row, which we consider being placed into the first st of the previous row. Place the next dc of Row 5 into the next st.

In Row 5, the ch-2 at the top of the umbrella creates a little bump. In the instructions, we’re at the middle column on page 79, where it says “Rotate piece to work points…” in the direction of the long arrow.

As you finish Row 5, you’ll make the picot points of the umbrella into the sides of the sc-sts indicated by yellow dots. The magenta lines point to the sides of the long sts or turning-chains where you will place sl sts.

Here’s the umbrella’s handle and point. Leave a long end for sewing.

To place the umbrella point, insert your hook from right side to back through the ch 2 space of Row 5, then hook the tip of the umbrella point.

With the point on the hook, pull the hook out of the ch 2 space, stopping just before the ends come through.

Arrange the handle to emerge from under the middle of the umbrella. Use the long sewing end to sew it in place on the wrong side of the umbrella.
Throwback Thursday, Eva’s Button Cloth

We played with polymer clay a lot in the late 1990s. It was a great way to pass the time during the frequent rainy, gloomy days in Sheffield. And modeling something so pretty and colorful, and then being able to bake it and make it permanent was very compelling. (Still is!)
I made lots of buttons, so five-year-old Eva did, too. She used the different tools and cutters, and sometimes repurposed my millefiori off-cuts. I made this cloth to showcase her buttons, and it hung on her wall for years.

Two things stand out in my memory of those days. As we worked one day, Eva asked, “Mama, what if I become better at this than you are?”
And the other was when she finished the large button in this detail picture. It has nine or ten sew-through holes. “Mama, it’s going to take you a long time to sew on this button, because it has so many holes.”
Tiny Crocheted Prom Dress–A Pattern Supplement
It’s prom season on Cute Crochet World! Oh my–if only the prom dresses of Earth were as easy and inexpensive to make as the prom dresses of Cute Crochet World! Our bank accounts would be a lot fatter.
While humans can’t necessarily wear this dress from Cute Crochet World the book (“Dress-Up Time,” pp. 122-123), you might want to make one or more anyway, using the step-by-step photos below to supplement the instructions in the book.
BUT FIRST
Some Cute Ideas for Using this Pretty Dress-Up Dress
- Photograph the dress. Use your digital camera photo software to cut the dress from from the background (I use the magnetic lasso tool on Adobe Photoshop Elements). Paste into a word processing document and create after-prom party invitations.
-
Color photocopy the dress, enlarging or reducing it to the appropriate size for your project. Again, cut the dress from the background, paste onto a printed party invitation. Then you can make multiple color copies from this original.
-
Use the dress itself for a prom memories scrapbook page.
-
Crochet it with very fine thread and use it to decorate a picture frame.
-
Pin to your bulletin board.
-
Make a Prom Dress Doily from the pattern in Love of Crochet, Summer 2016. See this post.
Step-by-Step Photos

Start crocheting the dress from the waist down. The photo above shows Row 1 of the Skirt done, and Row 2 started. Row 2 instructs you to “dc in the first dc,” indicated by the yellow line. The turning ch-3 usually counts as the stitch in the first st, but since we’re increasing, this stitch will now have two stitches in it.

Row 4 is all picots, worked in the back loop only. This is what a finished Row 4 looks like. The yellow lines are pointing to the front loops, which haven’t been worked yet. When you turn the piece after Row 4, these front loops will become back loops. Row 5 is worked into the back loops.

Row 8 is finished here, and I am joining color B to the first stitch with a tr. To do this, place a slip knot on the hook (as if you were starting a project), yo twice, draw up a loop in the first st (4 loops on hook), and finish the tr. I like starting a new color this way, because it looks better to me than joining with a sl st and chaining.

The skirt is finished, and I’m starting back at the waist, looking at the right side of the skirt, and joining color A with a hdc.


To make the cap sleeve, chain as instructed (top photo) and make two picots to define the sleeve (lower photo). At this point, you will skip the picots and make the first st in the next ch, which is indicated by the yellow line.

The hdc-decrease pulls the sleeve upward.

After the neck shaping, place a marker as instructed in the pattern.

For the first sleeve, the chain formed the outside edge of the sleeve. For this sleeve, the chain forms the inside or upper edge of the sleeve. The yellow line shows where to place the first st after the picots. The shaping is slightly different, to make it symmetrical with the other sleeve.

And finish the sleeve and the top of the dress with a sl st in the stitch you marked earlier.


The corsage is pretty simple. To reduce bulk, make a ring with the yarn. Work into the ring, then tighten the first yarn end to form the flower.

Whew! You can stop now, if you’re pleased with your dress. It looks sort of summery and informal. Read on if you prefer to add the drapes.

Here’s the drape, with Row 1 complete. Work Row 2 into the original chain, opposite of the stitches of Row 1, as shown by the yellow lines. They will actually mirror each other—hdc across from hdc, dc across from dc, and so on. (Htr how-to here.)

The long sewing length is at the lower end of the drapes. To keep them symmetrical, start the trim at the top of one drape and at the lower end of the other drape.
Arrange the drapes and sew in place.
Even after blocking, my picot rows tended to stand up, so this time, I sewed real pearls of plastic on each picot for an even fancier ball gown.

How to Do the “htr”
This tutorial is written using United States crochet terminology.
The half-treble or htr is a step between the double crochet (dc) and the treble crochet (tr). It’s a little taller than a dc, but shorter than a tr. I wrote more about the htr at Crochet Spot.
Here’s how to make the US htr:
- Yarn over hook twice (as if you are going to make a tr)
- Insert hook into next stitch and pull up a loop (4 loops on hook) as in the photo below.
- Yarn over and pull through two loops (3 loops on hook). See photo below.
- Yarn over and pull through all three loops on hook (one loop left, and htr complete). It’s just a little shorter than a tr.


In U. K. crochet terminology, the US htr would be UK hdtr.
Visions Art Museum Challenge Met
From the Visions Art Museum website:
The mission of Visions Art Museum is to create an international community of quilt and textile artists, collectors and the public through exhibitions, education, and engaging programs that increase the appreciation of quilts, textiles and fiber as fine art…
Visions Art Museum: Contemporary Quilts + Textiles is a program of Quilt San Diego, a non-profit arts organization founded in 1985 to promote contemporary quilt making as fine art.

It sounds pretty good, but this is what drew me in and caused me to part with hard-earned dollars for the membership fee: exhibition opportunities!
Visions Museum offers frequent members’ challenges, themed online exhibits, and juried exhibitions—in other words, exactly what I spend a lot of time looking for.
The challenge pieces are small, giving quilters the chance to show their work without spending weeks on a project. The quilts are all for sale, with half of the sale price going to the museum, and half to the artist. Now that is a deal.
The current members’ challenge was to make a 10″ wide x 14″ tall quilt with an abstract theme. Over 60 quilters answered the call, and our quilts are on display (and for sale) at the museum from April 18 – July 5, 2015.
Mine is called Sunshine through Fog, and you can find a teeny-tiny photo of it on the Visions website here.
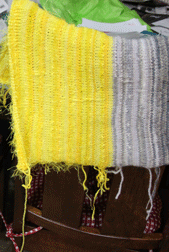
Sunshine through Fog is pieced from fabric knitted on my Ultimate Sweater Machine. I like to shade colors of yarn as I knit, like the black-gray-white shading for this piece. This is what the fabric looked like after blocking. There’s a lot of yellow, because more small quilts with a similar look are on the drawing board.
This photo shows the quilt top pieced and pinned to batting and backing, ready to quilt. But wait… I discovered recently that a layer of tulle holds the unruly cut edges of the knitting in place. After consulting with a long-time associate (my teenage daughter, Eva), I added a layer of silvery-white tulle to the top, cutting out the spaces over the yellow areas.
The next members’ challenge for me is “Curves,” which opens at the museum in October.
Create Your Own Piece of TextileFusion

First I have to tell you this story. When Lark Books contracted with me to write Crochet Bouquet, my editor sent me pictures of crocheted flowers from the internet. “Here’s some inspiration,” she said, more or less. I looked through the pictures and then there was a picture of this wall hanging. One of my knitted, embellished quilts had crossed over into the realm of inspiration. It was a good day!
And now, back to the present. This piece, titled Shards 2: Sometimes, is a work of TextileFusion.
Join me on Saturday, April 18, 2015, to learn how the TextileFusion technique developed. Then make a small piece of TextileFusion of your very own!
The San Jose Museum of Quilts and Textiles (520 South First Street, San Jose, CA) is hosting the workshop from 11 a.m. to 2 p.m. Read more about the TextileFusion workshop and register here.

TextileFusion Workshop, San Jose, CA, April 18th

Try your hand at TextileFusion on April 18th, 2015, 11 a.m. to 2 p.m., at The San Jose Museum of Quilts and Textiles, San Jose, California. This sample quilt is similar to what we will be making. It started as a thrift store sweater.
Register and read more about it here.
After a colorful slide presentation about how TextileFusion techniques came to be, each of us will make a small knitted, embellished quilt from an old sweater. In case you’re wondering—yes!—we will cut it up! You will need scissors, pins, hand-sewing needles and a non-lace sweater (preferably wool or cotton) that you don’t mind cutting up. Skills required: simple hand sewing, sewing buttons.
I hope you will join me and my lovely assistant (daughter Ella) for this quick mixed-media exercise at:
The San Jose Museum of Quilts and Textiles
520 South First Street
San Jose, CA 95113When her hand-knit sweaters and scarves threatened to take over the house, Suzann Thompson decided it was time to knit art. Her TextileFusion technique, which includes knitting, quilting, crochet, and embellishment, developed over years of trial and error. She found help and encouragement as well as the occasional epiphany from people and books, sometimes in the most unexpected ways (she learned that you have to pay attention!). Accompanied by a colorful slide presentation, Suzann describes the development TextileFusion. Then workshop participants make their own 6 3/4 x 8 1/2 inch piece of TextileFusion. Please look for Suzann’s work at www.textilefusion.com.
Mosaic Memories Monday: Moments with Barbara Walker
It was at the Interweave Knitting Lab, October 2012, in Manchester, New Hampshire. I was teaching a class about how to knit mosaic patterns and design your own. The workshop participants were enthusiastic and they were close to completing our first mosaic sample: a dotty heart pattern.

All at once, the door opened, and in walked a small white-haired lady in a sparkling mosaic sweater. We saw, as if in a dream, Barbara Walker, the first champion of the mosaic knitting technique, the developer of a very clever mosaic knit charting method, the designer of many, many mosaic patterns. All this and much, much more.

Barbara examined the mosaic samplers and graciously allowed us to photograph her and her lovely sweater and bag. She never uses a sweater pattern. She just decides which stitch motifs to use, and then knits from the top down.
She left us star-struck, and we continued our workshop with renewed vigor.
Barbara was the keynote speaker for the conference. I wouldn’t have missed her speech for anything. She produced several treasuries of knitting stitch patterns, which to my mind are the foundation for all modern knit stitch treasuries and the inspiration for many knitting patterns we’ve seen in books and magazines for the last 30 years.
A 1952 graduate of University of Pennsylvania, Barbara wrote for the Washington Star newspaper for years. The paper closed two or three years after she left. At some point, she took two classes in medieval history, where oddly no mention was made of the Inquisition. This got her started researching the history of religion. Among other things, this study resulted in the publication of her thoroughly engrossing encyclopedias of feminine symbols and mythology.
Here are a few lines from Barbara Walker’s speech, which made me admire her even more:
Regarding the relative creativity of the people in the room:
“You have probably knitted as much as I have, but you didn’t keep count. You are as creative as I am, but you just haven’t put it in books.”
Regarding how she was able to produce so much:
The television broke. About six years later, she called a repairman. “I got a lot done in that time,” she said.
“I was always solitary. That’s how I got so much done.”
And finally,
“I want to surprise myself. I don’t want to be bored.”
Thank you, Barbara Walker. Your work has made a large and lasting impression on my life.

Pieces of Antelope Horns
The day I learned about foundation piecing was a great day in my wall hanging career. The book that taught me was Precision Pieced Quilts Using the Foundation Method by Jane Hall and Dixie Haywood. The technique solved some problems I encountered while trying to piece and quilt knitted fabric.

You place your patches onto a piece of fabric called the foundation fabric. You won’t be able to see the foundation fabric in the finished quilt. I use fabrics that have been around the house for a while without being used. “A while” means years in the case of this Halloween theme fabric.
To help me orient the pieces on the fabric, I ironed creases in the fabric at halfway points. The pattern poster was also folded at the same points. As I placed the first flower and leaf pieces on the fabric, I lined up the folds.
The edges of the patches are snugged right up next to each other—no overlap.

I love to work jigsaw puzzles, so this was fun to do. Thank goodness for the second poster, though. I had to consult it several times to figure out how a certain petal fit—even though the petals were numbered.

The poster pattern plan worked well!

I took the paper patterns off, and pinned the knitted patches onto the foundation fabric.

I zig-zag stitched the patches together, with a zig in one patch and the zag in the patch next to it. At the same time, the zig-zag stitches sewed the pieces to the foundation.


