How to Do the “htr”
This tutorial is written using United States crochet terminology.
The half-treble or htr is a step between the double crochet (dc) and the treble crochet (tr). It’s a little taller than a dc, but shorter than a tr. I wrote more about the htr at Crochet Spot.
Here’s how to make the US htr:
- Yarn over hook twice (as if you are going to make a tr)
- Insert hook into next stitch and pull up a loop (4 loops on hook) as in the photo below.
- Yarn over and pull through two loops (3 loops on hook). See photo below.
- Yarn over and pull through all three loops on hook (one loop left, and htr complete). It’s just a little shorter than a tr.


In U. K. crochet terminology, the US htr would be UK hdtr.
Visions Art Museum Challenge Met
From the Visions Art Museum website:
The mission of Visions Art Museum is to create an international community of quilt and textile artists, collectors and the public through exhibitions, education, and engaging programs that increase the appreciation of quilts, textiles and fiber as fine art…
Visions Art Museum: Contemporary Quilts + Textiles is a program of Quilt San Diego, a non-profit arts organization founded in 1985 to promote contemporary quilt making as fine art.

It sounds pretty good, but this is what drew me in and caused me to part with hard-earned dollars for the membership fee: exhibition opportunities!
Visions Museum offers frequent members’ challenges, themed online exhibits, and juried exhibitions—in other words, exactly what I spend a lot of time looking for.
The challenge pieces are small, giving quilters the chance to show their work without spending weeks on a project. The quilts are all for sale, with half of the sale price going to the museum, and half to the artist. Now that is a deal.
The current members’ challenge was to make a 10″ wide x 14″ tall quilt with an abstract theme. Over 60 quilters answered the call, and our quilts are on display (and for sale) at the museum from April 18 – July 5, 2015.
Mine is called Sunshine through Fog, and you can find a teeny-tiny photo of it on the Visions website here.
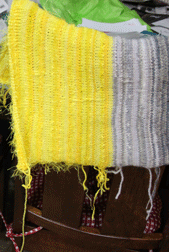
Sunshine through Fog is pieced from fabric knitted on my Ultimate Sweater Machine. I like to shade colors of yarn as I knit, like the black-gray-white shading for this piece. This is what the fabric looked like after blocking. There’s a lot of yellow, because more small quilts with a similar look are on the drawing board.
This photo shows the quilt top pieced and pinned to batting and backing, ready to quilt. But wait… I discovered recently that a layer of tulle holds the unruly cut edges of the knitting in place. After consulting with a long-time associate (my teenage daughter, Eva), I added a layer of silvery-white tulle to the top, cutting out the spaces over the yellow areas.
The next members’ challenge for me is “Curves,” which opens at the museum in October.
Create Your Own Piece of TextileFusion

First I have to tell you this story. When Lark Books contracted with me to write Crochet Bouquet, my editor sent me pictures of crocheted flowers from the internet. “Here’s some inspiration,” she said, more or less. I looked through the pictures and then there was a picture of this wall hanging. One of my knitted, embellished quilts had crossed over into the realm of inspiration. It was a good day!
And now, back to the present. This piece, titled Shards 2: Sometimes, is a work of TextileFusion.
Join me on Saturday, April 18, 2015, to learn how the TextileFusion technique developed. Then make a small piece of TextileFusion of your very own!
The San Jose Museum of Quilts and Textiles (520 South First Street, San Jose, CA) is hosting the workshop from 11 a.m. to 2 p.m. Read more about the TextileFusion workshop and register here.

TextileFusion Workshop, San Jose, CA, April 18th

Try your hand at TextileFusion on April 18th, 2015, 11 a.m. to 2 p.m., at The San Jose Museum of Quilts and Textiles, San Jose, California. This sample quilt is similar to what we will be making. It started as a thrift store sweater.
Register and read more about it here.
After a colorful slide presentation about how TextileFusion techniques came to be, each of us will make a small knitted, embellished quilt from an old sweater. In case you’re wondering—yes!—we will cut it up! You will need scissors, pins, hand-sewing needles and a non-lace sweater (preferably wool or cotton) that you don’t mind cutting up. Skills required: simple hand sewing, sewing buttons.
I hope you will join me and my lovely assistant (daughter Ella) for this quick mixed-media exercise at:
The San Jose Museum of Quilts and Textiles
520 South First Street
San Jose, CA 95113When her hand-knit sweaters and scarves threatened to take over the house, Suzann Thompson decided it was time to knit art. Her TextileFusion technique, which includes knitting, quilting, crochet, and embellishment, developed over years of trial and error. She found help and encouragement as well as the occasional epiphany from people and books, sometimes in the most unexpected ways (she learned that you have to pay attention!). Accompanied by a colorful slide presentation, Suzann describes the development TextileFusion. Then workshop participants make their own 6 3/4 x 8 1/2 inch piece of TextileFusion. Please look for Suzann’s work at www.textilefusion.com.
Mosaic Memories Monday: Moments with Barbara Walker
It was at the Interweave Knitting Lab, October 2012, in Manchester, New Hampshire. I was teaching a class about how to knit mosaic patterns and design your own. The workshop participants were enthusiastic and they were close to completing our first mosaic sample: a dotty heart pattern.

All at once, the door opened, and in walked a small white-haired lady in a sparkling mosaic sweater. We saw, as if in a dream, Barbara Walker, the first champion of the mosaic knitting technique, the developer of a very clever mosaic knit charting method, the designer of many, many mosaic patterns. All this and much, much more.

Barbara examined the mosaic samplers and graciously allowed us to photograph her and her lovely sweater and bag. She never uses a sweater pattern. She just decides which stitch motifs to use, and then knits from the top down.
She left us star-struck, and we continued our workshop with renewed vigor.
Barbara was the keynote speaker for the conference. I wouldn’t have missed her speech for anything. She produced several treasuries of knitting stitch patterns, which to my mind are the foundation for all modern knit stitch treasuries and the inspiration for many knitting patterns we’ve seen in books and magazines for the last 30 years.
A 1952 graduate of University of Pennsylvania, Barbara wrote for the Washington Star newspaper for years. The paper closed two or three years after she left. At some point, she took two classes in medieval history, where oddly no mention was made of the Inquisition. This got her started researching the history of religion. Among other things, this study resulted in the publication of her thoroughly engrossing encyclopedias of feminine symbols and mythology.
Here are a few lines from Barbara Walker’s speech, which made me admire her even more:
Regarding the relative creativity of the people in the room:
“You have probably knitted as much as I have, but you didn’t keep count. You are as creative as I am, but you just haven’t put it in books.”
Regarding how she was able to produce so much:
The television broke. About six years later, she called a repairman. “I got a lot done in that time,” she said.
“I was always solitary. That’s how I got so much done.”
And finally,
“I want to surprise myself. I don’t want to be bored.”
Thank you, Barbara Walker. Your work has made a large and lasting impression on my life.

Pieces of Antelope Horns
The day I learned about foundation piecing was a great day in my wall hanging career. The book that taught me was Precision Pieced Quilts Using the Foundation Method by Jane Hall and Dixie Haywood. The technique solved some problems I encountered while trying to piece and quilt knitted fabric.

You place your patches onto a piece of fabric called the foundation fabric. You won’t be able to see the foundation fabric in the finished quilt. I use fabrics that have been around the house for a while without being used. “A while” means years in the case of this Halloween theme fabric.
To help me orient the pieces on the fabric, I ironed creases in the fabric at halfway points. The pattern poster was also folded at the same points. As I placed the first flower and leaf pieces on the fabric, I lined up the folds.
The edges of the patches are snugged right up next to each other—no overlap.

I love to work jigsaw puzzles, so this was fun to do. Thank goodness for the second poster, though. I had to consult it several times to figure out how a certain petal fit—even though the petals were numbered.

The poster pattern plan worked well!

I took the paper patterns off, and pinned the knitted patches onto the foundation fabric.

I zig-zag stitched the patches together, with a zig in one patch and the zag in the patch next to it. At the same time, the zig-zag stitches sewed the pieces to the foundation.
A Flower Called Antelope Horns

“They look like aliens,” said my husband, when he saw this photo, blown up to poster size. It’s a very close-up view of Antelope Horns milkweed, one of the coolest flowers I love.
We saw this particular plant on my parents’ place and I believe my daughter Ella snapped this picture with my phone. The five-petal flowerets are about half an inch across in real life, which makes their fantastic detail hard to see very well. I cropped the photo and had it printed as two 2 x 3-foot posters.

One poster was my pattern for cutting out the leaves and petals. I numbered each flower, leaf, and background piece on the poster and on a black-and-white printout before cutting.

I cut each flower into individual petals. I left the white and purple bits in place, planning to applique those onto the surface later. At this point, the important thing was to make a solidly-covered quilt top.

Before all this numbering and cutting business, I knitted the fabric for the Antelope Horns wall hanging on the Ultimate Sweater Machine. The knitting took about three hours, even with all the color and yarn changes (they are easy on the USM). I steam blocked the fabric and then stabilized it with fusible interfacing. The interfacing stops the stitches from unraveling when I cut the fabric. Also machine-sewing the patches is a lot easier when they are stabilized.

After all the individual petals were cut out, I pinned them to my knitted, stabilized fabric. I tried to line up the petals from one flower, so that they would mostly have the same striations in the knitted fabric. Time to cut out again.

Okay, here are the pieces of the poster with knitting pinned underneath. The next step is to piece them all back together.
Crochet, Science, and Our Daughters

My college sophomore daughter, Eva, was home for the holidays. We don’t have a TV, we live in the country, her friends were scattered across the state, and there’s only so much Twitter and such a person can do before petrification sets in.
“Mom, I want to crochet,” she said.
Was it my imagination, or did a choir of angels sing “Hallelujah” at that moment? It could be–her words were definitely music to my ears.
She chose some lovely Berroco Remix yarn (blended from 100% recycled fibers). I showed her the basic idea of a raglan sweater from the top down. She got to work.
With only one minor redesign and a minimum of ripping out and recrocheting, Eva completed a sweater for her stuffed kitty.
But one sweater was not enough. Eva crocheted a cell model. You can tell this is an animal cell model, because it has a cell membrane (blue). The nucleus has a pale green membrane and the red squiggles inside are genetic material. The green ovals are vacuoles and the red oval is a mitochondrion, powerhouse of the cell. The Golgi apparatus is yellow and the endoplasmic reticulum is squiggly and blue. Note that it has no bumps on it, therefore it is smooth endoplasmic reticulum.

This episode reminded me of a long, interesting, and sometimes saddening article I read in the New York Times a while ago, “Why are There Still so Few Women in Science?” Author Eileen Pollack, a novelist and creative writing professor at University of Michigan, spoke to astrophysicist Meg Urry of Yale University, who had this to say about crafting:
“I’m soldering things, and I’m thinking, Hey, I’m really good at this. I know the principles. It’s like an art. It took me years to realize I’m actually good with my hands. I have all these small-motor skills from all the years I spent sewing, knitting and designing things. We should tell young women, ‘That stuff actually prepares you for working in a lab.'”
Yes, let’s tell this to our crafting daughters and sons! It’s another of the many benefits of “sewing, knitting, and designing things.”
I laughed ruefully after reading Professor Urry’s assertion that “Women need more positive reinforcement, and men need more negative reinforcement. Men wildly overestimate their learning abilities, their earning abilities. Women say, ‘Oh, I’m not good, I won’t earn much, whatever you want to give me is O.K.'”
Why ruefully? Because when I was a biology major, oh so long ago, I was exactly the woman she was talking about.
The crocheted cell model opened doors for Eva. She emailed a photo of it to her last semester’s biology professor. A week later the professor invited her and a few other former students to lead review sessions for the same biology class this semester. No pay, but the professor promised glowing letters of recommendation.
“I think it also helped that my friend and I went to her class last Halloween, dressed up as NAD and NADH molecules,” said Eva.
Mark Your Calendars for Great Crochet

We’ll have a lot to celebrate on March 17 this year. Naturally we’ll be wearing green (or our color of choice) for St. Patrick’s Day. Then we can mosey down to the nearest newsstand for a copy of the Spring 2015 issue of Interweave Crochet.
One of my career goals has been to publish a design in Interweave Crochet. Well, this is it! My Dogwood Scarf appears in this issue. And here’s the best part: it’s on the cover!
I hope you’ll buy a copy, because it has lots more great crochet designs in it. Or better yet, subscribe. Find more information
Throwback Thursday: Cherry Picking Vest

Moths have good taste. They chose to place their offspring on my beloved cherry sweater,
which I knitted by hand from Sasha Kagan’s Big and Little Sweaters. On their way to adulthood, the baby moths nibbled more holes than I wanted to repair.
So I put the cherry sweater with an oversized red sweater that never looked good on me
anyway, and made this crazy-patchwork vest.
After machine embroidering the red sweater I stabilized the knitting with
fusible interfacing.
I cut the stabilized sweaters into patches and arranged them on a lightweight cotton foundation
cut from a commercial vest pattern. I sewed them in place.
Oh no, the patchwork didn’t look good! The bright reds, blue, and white looked too busy and choppy. What could I do?
Decorative stitching along the join lines helped a little. I tried various tricks to tone down
the stridently contrasting colors.
Finally I saw what was in front of my eyes the whole time. The vest had a circle theme (the
red cherries and the embroidery motifs). What (usually) circular item do I love and have in
droves? Buttons! To tone down the white, I added red buttons (an echo of the cherries). I made the busy pattern even busier! Much better.
If red buttons on the white areas looked good, would white buttons on the red and blue areas
be even more wonderful? I tried it out. Yes! This is one of the happiest projects I’ve ever made.
It makes me smile every time I see it.
This vest was accepted into the Small Wonders exhibition at the 2005 Spring Quilt
Festival in Chicago